By: Team AY1920S2-CS2103T-W13-4 Since: Feb 2020 Licence: MIT
- 1. Before You Begin
- 2. Setting Up
- 3. Design
- 4. Implementation
- 5. Backend & Debugging
- 6. Documentation
- 7. Testing
- 8. Dev Ops
- 9. Proposed Future Enhancements
- Appendix A: Product Scope
- Appendix B: User Stories
- Appendix C: Use Cases
- C.1. Use Case: Add Plan (UCA01)
- C.2. Use Case: Delete Plan (UCA02)
- C.3. Use Case: Select Plan (UCA03)
- C.4. Use Case: Add Timetable (UCB01)
- C.5. Use Case: Delete Timetable (UCB02)
- C.6. Use Case: Select Timetable (UCB03)
- C.7. Use Case: Add Module (UCC01)
- C.8. Use Case: Delete Module (UCC02)
- C.9. Use Case: List Grades (UCD01)
- C.10. Use Case: Set Module Grade (UCD02)
- C.11. Use Case: Add Lesson (UCE01)
- C.12. Use Case: Delete Lesson (UCE02)
- Appendix D: Non-Functional Requirements
- Appendix E: Glossary
- Appendix F: Product Survey
- Appendix G: Instructions for Manual Testing
- G.1. Launch and Shutdown
- G.2. Adding a Plan
- G.3. Deleting a Plan
- G.4. Selecting a Plan
- G.5. Adding a Timetable
- G.6. Deleting a Timetable
- G.7. Selecting a Timetable
- G.8. Adding a Module
- G.9. Deleting a Module
- G.10. Setting the Grade of a Module
- G.11. Viewing the Grade of a Module
- G.12. Viewing the Grades of a Plan
- G.13. Viewing the Graduation Requirements of a Plan
- G.14. Setting the Specialisation of a Plan
- G.15. Adding a Lesson
- G.16. Removing a Lesson
- G.17. Listing all Lesson
- G.18. Viewing module information
- G.19. Viewing lesson information for a module
- G.20. Saving Data
1. Before You Begin
Welcome to the Developer Guide for the NUS Module Planner! Unlike the User Guide that has been ordered in the flow for a user, this guide has been ordered lexicographically (specifically for Implementation) to assist you in finding the features and their implementations faster.
| As usual, if you have questions, feature suggestions or bugs to report, feel free to open an issue in our Issue Tracker on GitHub! |
2. Setting Up
Refer to the guide here.
3. Design
3.1. Architecture

The Architecture Diagram given above explains the high-level design of the App. Given below is a quick overview of each component.
The .puml files used to create diagrams in this document can be found in the diagrams folder.
Refer to the Using PlantUML guide to learn how to create and edit diagrams.
|
-
At app launch: Initializes the components in the correct sequence, and connects them up with each other.
-
At shut down: Shuts down the components and invokes cleanup method where necessary.
Commons represents a collection of classes used by multiple other components.
The following class plays an important role at the architecture level:
-
LogsCenter: Used by many classes to write log messages to the App’s log file.
The rest of the App consists of four components.
Each of the four components
-
Defines its API in an
interfacewith the same name as the Component. -
Exposes its functionality using a
{Component Name}Managerclass.
For example, the Logic component (see the class diagram given below) defines it’s API in the Logic.java interface and exposes its functionality using the LogicManager.java class.

How the architecture components interact with each other
The Sequence Diagram below shows how the components interact with each other for the scenario where the user issues the command student remove 1.

student remove 1 commandThe sections below give more details of each component.
3.2. UI Component

API : Ui.java
The UI consists of a MainWindow that is made up of parts e.g. CalendarBox, CommandBox, GradWindow, ModuleCard, ModuleListPanel, ResultDisplay, StatusBarFooter etc. All these, including the MainWindow, inherit from the abstract UiPart class.
The UI component uses JavaFx UI framework. The layout of these UI parts are defined in matching .fxml files that are in the src/main/resources/view folder. For example, the layout of the MainWindow is specified in MainWindow.fxml
The UI component,
-
Executes user commands using the
Logiccomponent. -
Listens for changes to
Modeldata so that the UI can be updated with the modified data.
3.3. Logic Component

API :
Logic.java
-
Logicuses thePlannerParserclass to parse the user command. -
This results in a
Commandobject which is executed by theLogicManager. -
The command execution can affect the
Model(e.g. adding a Student). -
The result of the command execution is encapsulated as a
CommandResultobject which is passed back to theUi. -
In addition, the
CommandResultobject can also instruct theUito perform certain actions, such as displaying help to the user.
Given below is the Sequence Diagram for interactions within the Logic component for the execute("student remove 1") API call.

student remove 1 Command
The lifeline for StudentRemoveCommandParser should end at the destroy marker (X) but due to a limitation of PlantUML, the lifeline reaches the end of diagram.
|
3.4. Model Component
3.4.1. Planner Model

API : Planner.java
The Planner,
-
stores a
UserPrefobject that represents the user’s preferences. -
stores the Planner data such as the list of
Student,Module -
store an index for the currently active
Student -
store an index for the currently active
Semester -
exposes an unmodifiable
ObservableList<Student>that can be 'observed' e.g. the UI can be bound to this list so that the UI automatically updates when the data in the list change. -
exposes an unmodifiable
ObservableList<Module>that can be 'observed' e.g. the UI can be bound to this list so that the UI automatically updates when the data in the list change. -
does not depend on any of the other three components.
3.4.2. Student Model
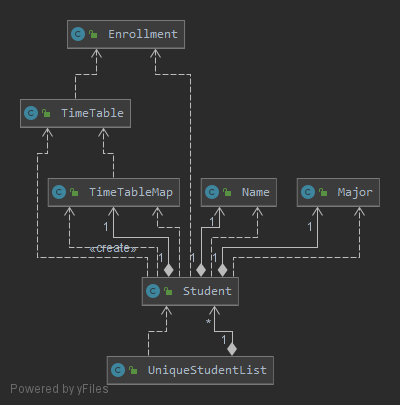
API : Student.java
The Student,
-
stores a
Nameobject that represents the Student’s Name -
stores a
Majorobject that represents the Student’s Major -
stores a
Enrollmentobject that represents the Student’s Name -
stores a
TimeTableMapobject that represents the Student’s TimeTables -
stores a
GenericSpecialisationobject that represents the Student’s Specialisation -
stores a
List<Lesson>object that represents the Student’s currently selected Lessons
3.4.3. Module Model

API : Module.java
The Module,
-
stores a
ModuleCodeobject that represents the Module’s Module Code. This is used as the key identifier between modules. -
stores a
List<SemesterData>object that represents the Semester-specific data of the Module, such as Exam Dates, Exam Duration and Timetable. -
stores other
Stringobjects that represents the various other attributes of the Module such as:-
acadYearrepresenting Academic Year -
preclusionrepresenting Precluded Modules -
descriptionrepresenting Module Description -
titlerepresenting Module Title -
departmentrepresenting Module department -
facultyrepresenting Module faculty -
workloadrepresenting Module workload -
prerequisiterepresenting Module prerequisites -
moduleCreditrepresenting Module Credits -
prereqTreerepresenting Module prerequisite tree
-
The ModuleDataImporterUtil,
-
is a helper class used to load Modules from a JSON file downloaded from NUSMods API
-
handles the conversion of Modules from JSON format to
Moduleobjects usingJsonSerializableModuleandJsonAdaptedModule -
loads
SemesterDatainto eachModule
3.4.4. Graduation Models

API : Graduation Package
The Graduation package,
-
contains a list of
GraduationRequirementclasses that represents the Modules which are required to be taken by Student in order to Graduate. -
contains an
AggregationTypeclass
3.4.5. Graduation Requirement Model
The GraduationRequirement interface,
-
provides the interface of all implementations of
GraduationRequirement -
provides a helper function
getStatusIconto display a tick or cross depending on whether theGraduationRequirementis fulfilled or not.
3.4.6. Single Graduation Requirement Model
The SingleGraduationRequirement class,
-
is an implementation of the interface
GraduationRequirement -
acts as a basic
GraduationRequirementcontaining only a singleModule -
determines if the
SingleGraduationRequirementis fulfilled by checking if theStudenthas enrolled in the specifiedModule
3.4.7. Compound Graduation Requirement Model
The CompoundGraduationRequirement class,
-
is an implementation of the interface
GraduationRequirement -
contains a list of
GraduationRequirementobjects -
contains an
AggregationTypeenum to represent how to calculate fulfillment of theCompoundGraduationRequirementobject -
acts as a aggregator of
GraduationRequirementrepresenting requirements where a Student needs to complete a group of modules in certain ways such as:-
any module can be completed or
-
all modules must be completed or
-
completed modules must be within a specified list
-
add up to a certain amount of Module Credits
-
-
determines if the
CompoundGraduationRequirementis fulfilled by checking if theStudenthas fulfilled the internal list ofGraduationRequirementstored in theCompoundGraduationRequirement, with checks based on theAggregationTypespecified.
3.4.8. Specialisation Graduation Requirement Model
The SpecialisationGraduationRequirement class,
-
is an implementation of the interface
GraduationRequirement -
contains a list of
GraduationRequirementobjects to represent a Specialisation’s primary modules -
contains a list of
GraduationRequirementobjects to represent a Specialisation’s elective modules -
handles the calculation of fulfillment for the
SpecialisationGraduationRequirementobject based onMajorand primary and elective modules
3.5. Storage Component
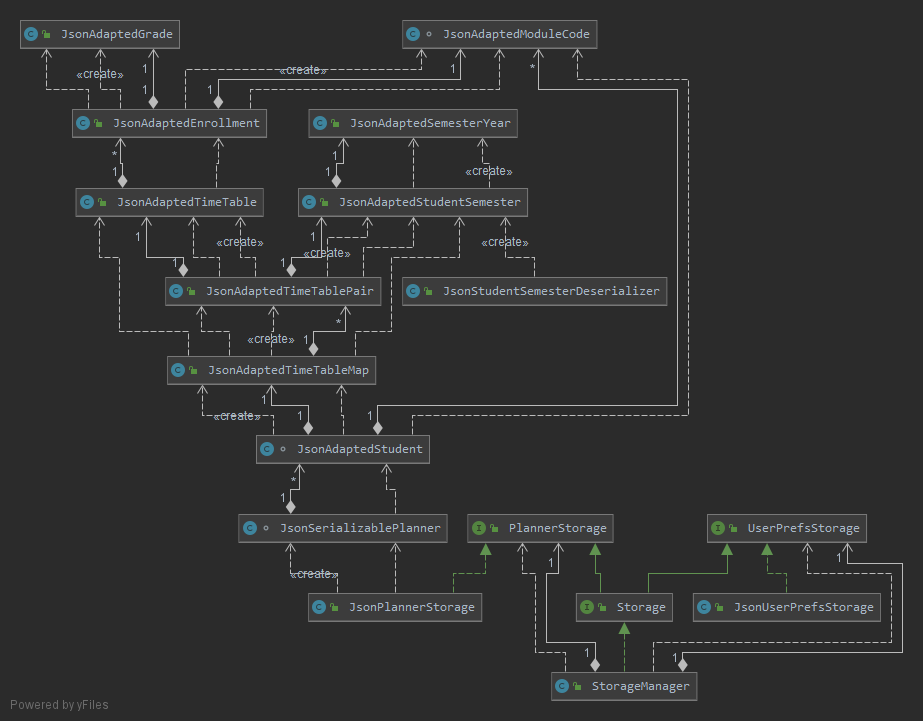
API : Storage.java
The Storage component,
-
can save
UserPrefobjects in json format and read it back. -
can save the Planner data in json format and read it back.
-
consists of various JSON implementations of Models
-
handles the saving and loading of Models to provide stateful behaviour in the application
Additional details on how certain Models were stored in JSON format is available at Section 5.2, “JSON Handling & Module Data Management”.
3.6. Common Classes
Classes used by multiple components are in the seedu.planner.commons package.
4. Implementation
This section describes our implementation and design decision details of the features in the NUS Module Planner. As a reminder, they have been ordered laconically for easier search and reference.
4.1. Calendar View
The application has a "Calendar Schedule" window implemented to allow students to see their timetable and lesson schedules. Once a lesson has been added, will they be visible in this window upon launch by the Launch Calendar button.
4.1.1. Calendar UI Implementation
There are two ways to view the Calendar. You can click on the launch calendar to see the lessons that you have added. Another way is to click on the semester button in the module description page to see the lessons available.
The Calendar builds its UI based on this implemented components:
-
Show Calendar
setCalendar(List<Lesson> lessons)
We will add more about how we implemented this further, and the design decisions made.
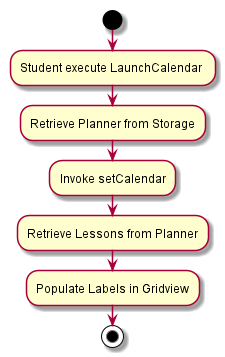
The Calendar populates each of the Label in the grid pane based on the list of Lesson provided by the planner.
4.1.2. Design Considerations
-
Alternative 1 (Current implementation): To build the table using scene builder with each labels being shaded to show the time
-
Pros: Every single UI component of the calendar is customizable, allowing for further modifications.
-
Cons: Tedious and duplicated code for each Label to be set a value.
-
-
Alternative 2: Use another library jfxtras which has an i calendar API
-
Pros: Reduce the amount of work needed to create the component
-
Cons: Comes with bugs that scene builder is unable to support
-
4.2. Grade Management
(Vincent wrote the section "Grade Management" below)
The Grade Management feature allows users to record and keep track of their grades in their academic plan, helping them to make better academic plans.
The Grade Management feature is made of two parts:
-
Module Grade Management:
module grade -
Student Grade Display:
student grade
4.2.1. Module Grade Management
The Module Grade Management allows users to record their grades.
4.2.1.1. Grade Representation
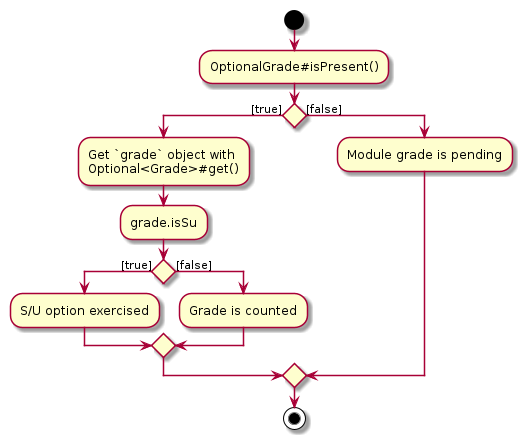
Each enrollment in each timetable of a student stores a module grade. The module grade can be pending, have the Satisfactory/Unsatisfactory option exercised, or be graded.
More specifically:
Each Student stores Enrollment objects in each value (of type TimeTable) of its timeTableMap : TimeTableMap.
Each Enrollment is then 1-1 associated to exactly one credit : Optional<Grade>.
When credit is equal to Optional.<Grade>empty(), the enrollment is considered to have a pending module grade.
When credit.isPresent() is true, then the Grade stored within can be interpreted as follows:
Grade objects are immutable, and its fields therefore can have public access modifiers and are final. Suppose there is a grade : Grade object.
The grade.letterGrade : LetterGrade represents the letter grade received for an enrollment, which can be one of:
A+, A, A-, B+, B, B-, C+, C-, D+, D, F, CS, CU, W or EXE.
The grade.isSu : boolean represents whether the Satisfactory/Unsatisfactory option was exercised for the grade.
For example, a student could choose to exercise the Satisfactory/Unsatisfactory option for a grade of "B+".
This is distinct from the grade.letterGrade.isSu : boolean, which determines if the letter grade itself is ungraded.
This occurs for module grades such as "CS" and "CU".
When at least one of grade.isSu or grade.letterGrade.isSu is true, the Grade object does not count towards academic performance.
The semantics of the Optional<Grade> object in an Enrollment can be summarised in the activity diagram below.
4.2.1.2. Module Grade Commands
The user views and sets grades of enrollments with a single command "module grade". Parsing of the command is handled by ModuleGradeCommandParser.
The ModuleGradeCommandParser parses the command string (e.g. "CS2040 grade/A") into the preamble which contains the module code, and the arguments which contains the grade.
Then it returns a subclass of ModuleGradeCommand (itself a subclass of ModuleCommand) which is declared abstract.
Its concrete subclasses are ModuleGradeViewCommand, ModuleGradeSetCommand and ModuleGradeResetCommand.
Refer to Sub-Commands to see how the ModuleGradeCommandParser is invoked by ModuleCommandParser.
-
To view a grade, the user uses the command format
"module grade MODULE_CODE". This will generate aModuleGradeViewCommandobject. -
To set a grade, there are two options. Both generate a
ModuleGradeSetCommandobject.-
To set a grade counted towards academic performance, the user uses the command format
"module grade MODULE_CODE grade/GRADE". -
To exercise the Satisfactory/Unsatisfactory option, the user uses the command format
"module grade MODULE_CODE su/GRADE".
-
-
To reset a grade, the user uses the command format
"module grade MODULE_CODE grade/". This will generate aModuleGradeResetCommandobject.
If both module/GRADE and su/GRADE parameters are supplied, the ModuleGradeCommandParser throws a ParseException
The ModuleGrade*Command#execute(Model) methods of the command objects generated then use Model#getModuleGrade(ModuleCode) and Model#setModuleGrade(ModuleCode) to get and set the enrollment’s grade, respectively.
The following class diagram summarises the associations of classes involved in the "module grade" command.
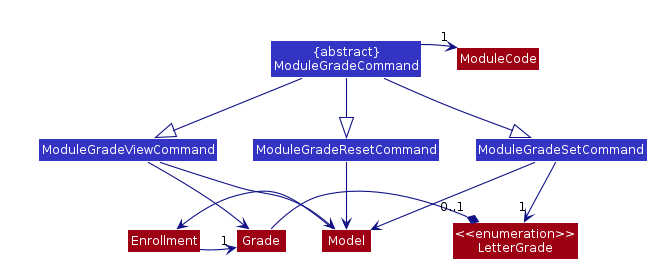
module grade classes4.2.2. Student Grade Display
The user may also view the cumulative grades of the selected Student using the "student grade" command.
The StudentCommandParser directly creates a StudentGradeCommand object (a subclass of StudentCommand), and all preamble and arguments are ignored.
StudentGradeCommand#execute(Model) then loops through all StudentSemester the selected student has using Model#getStudentSemesters(),
which returns the StudentSemester in chronological order (as defined in StudentSemester#compareTo()).
This ordering is more convenient to the user compared to the arbitrary ordering of internal to TimeTableMap.
Using Student#getTimeTable(StudentSemester) : TimeTable and TimeTable#getEnrollments() : UniqueEnrollmentList, each enrollment of each timetable is iterated in order.
Then Enrollment#getGrade() : Optional<Grade> is used to get the grade (pending, or S/U option exercised, or graded).
Since Grade#toString() is overloaded, StudentGradeCommand only needs to handle the case where the Optional<Grade> is empty.
The result text is accumulated to form a listing of modules taken and their grades.
During iteration, a CumulativeGrade accumulator object is also used to tally up statistics related to the grades of the enrollments.
CumulativeGrade handles the number of credits taken for graded, S/U-exercised and all Grade objects supplied.
StudentGradeCommand invokes the CumulativeGrade#accumulate(Grade grade, int credits) method, which handles all the logic necessary to correctly accumulate grade statistics.
4.2.3. Design Considerations
4.2.3.1. Aspect: Syntax of "module grade" command
-
Alternative 1: (current choice) Use a single command with
grade/andsu/prefixes which are mutually exclusive-
Pros: Only a single command is needed to handle both graded and S/U-exercised grades. Resetting an enrollment’s grade is also easy by allowing the user to specify an empty
grade/argument. -
Cons: The syntax might be confusing to the user, and there is the edge case of both
grade/andsu/being supplied, which must be handled.
-
-
Alternative 2: Use separate sub-commands for setting, resetting and exercising the Satisfactory/Unsatisfactory option.
-
Pros: The syntax is simpler for the user because there is only one format for each command.
-
Cons: Further commands have to be implemented, which causes code duplication.
-
4.2.3.2. Aspect: Representation of enrollment grades
-
Alternative 1: (current choice) Use an
Optional<Grade>which stores aLetterGradeandisSu : boolean-
Pros: Clearly distinguishes between a pending grade, a grade with Satisfactory/Unsatisfactory option exercised, and a grade which is counted towards academic performance.
Serialisation also directly corresponds tonullfor a pending grade. -
Cons: Handling the case where the grade is pending is not convenient for iteration.
-
-
Alternative 2: Use
Gradeto store whether the the grade is pending-
Pros: More convenient to use for developers.
-
Cons: Serialisation is more complex, and more complex code is needed to handle pending grades in the implementation of
Grade.
-
4.3. Graduation Requirements Features
The Graduation Requirements feature is what allows students to ensure that their academic plan and corresponding modules are assisting them towards fulfilling their own criteria to graduate.
4.3.1. Degree Management
The Graduation Requirements are made up of 2 implemented components:
-
Declaration of Major:
major set -
Declaration of Specialisation:
specialisation set
The Major and Specialisation entities are automatically created and populated through the JSON data received from NUSMods. Furthermore, Student entities can only be associated in a 1-0..1 relationship with a Specialisation entity.
The following high-level sequence diagrams illustrates the interactions between the Ui, Logic & Model components when either a Major or Specialisation is being set:
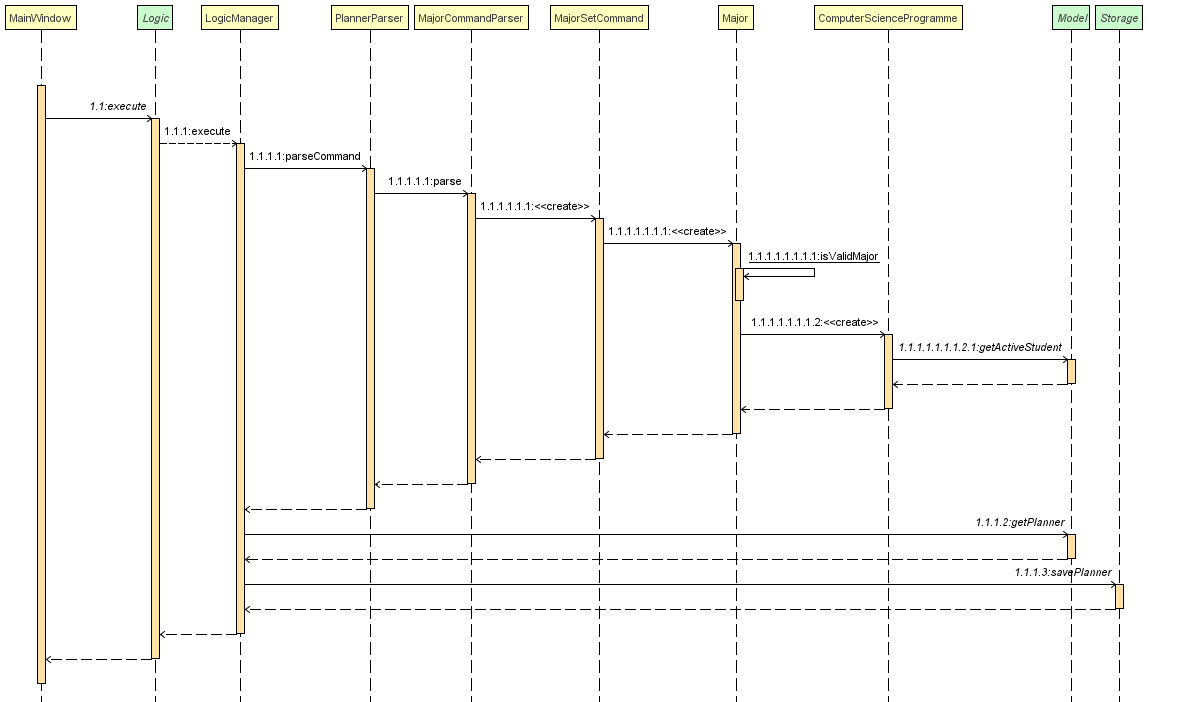
Major being set, with respect to MainWindow from Ui, Logic & Model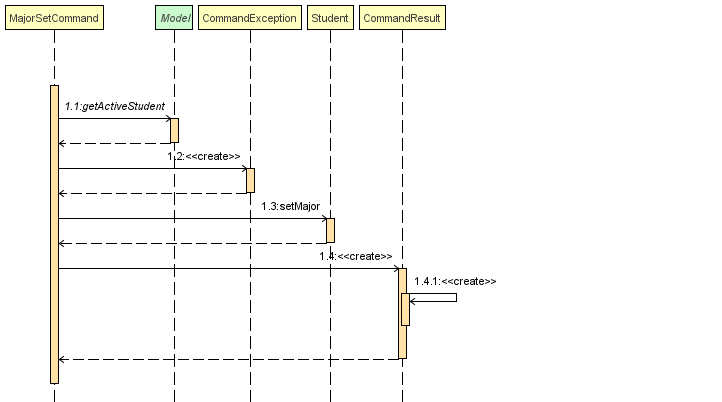
Major being set with respect to the MajorSetCommand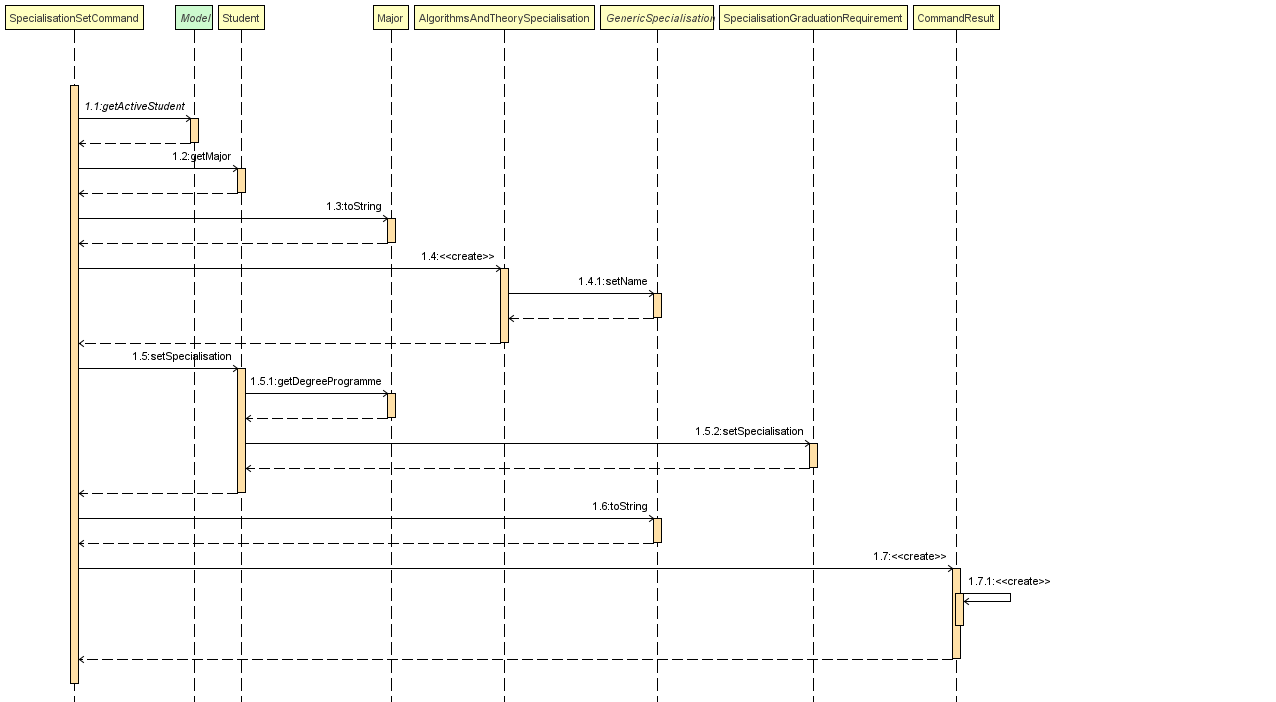
Specialisation being set (e.g. AlgorithmsAndTheorySpecialisation) with regards to SpecialisationSetCommand4.3.2. Verification of Graduation Requirement Fulfilment
Once the Major and Specialisation (if any), or a Student is set, the following logic is used to verify if the Student 's GraduationRequirements are being met, based on the list of Module which which the Student has enrolled in:
-
Retrieval of the main base of the
GraduationRequirementbased on theMajorand ultimatelyDegreeProgramof theStudent. -
Retrieval of the list of
Modulewhich theStudenthas enrolled in. -
Passing in of the list of enrolled
Moduleinto eachGraduationRequirementand determining if theGraduationRequirementhas been met.-
The modelling of the actual Graduation Requirements of NUS CS and IS undergraduate students are accomplished by making use of the various implementations of
GraduationRequirementsuch as-
CompoundGraduationRequirementfor groups ofModules which aStudentis allowed to choose from, with certain conditions for fulfilment such as:-
Minimum number of Modules
-
Minimum number of Module Credits
-
Minimum number of Modules that must be 4000-level or above
-
-
SpecialisationGraduationRequirementfor "Specialisations" or "Tracks" depending on the terminology of the respective faculty that theMajorbelongs to). -
WildcardGraduationRequirementfor Requirements that need to be fulfilled from a fixed pool ofModules which haveModuleCodes starting with certain characters (e.g. GEH, GES, GET)
-
-
-
Thereafter, the corresponding
Moduleentities that have been added will be verified against the compiledGraduation Requirements. -
Finally, requirements that are met, are checked or crossed accordingly - which is displayed in the left-panel of the GUI.
The flow of how the Graduation Requirements is put together with information from Major and Specialisation can be found in the below class diagram:
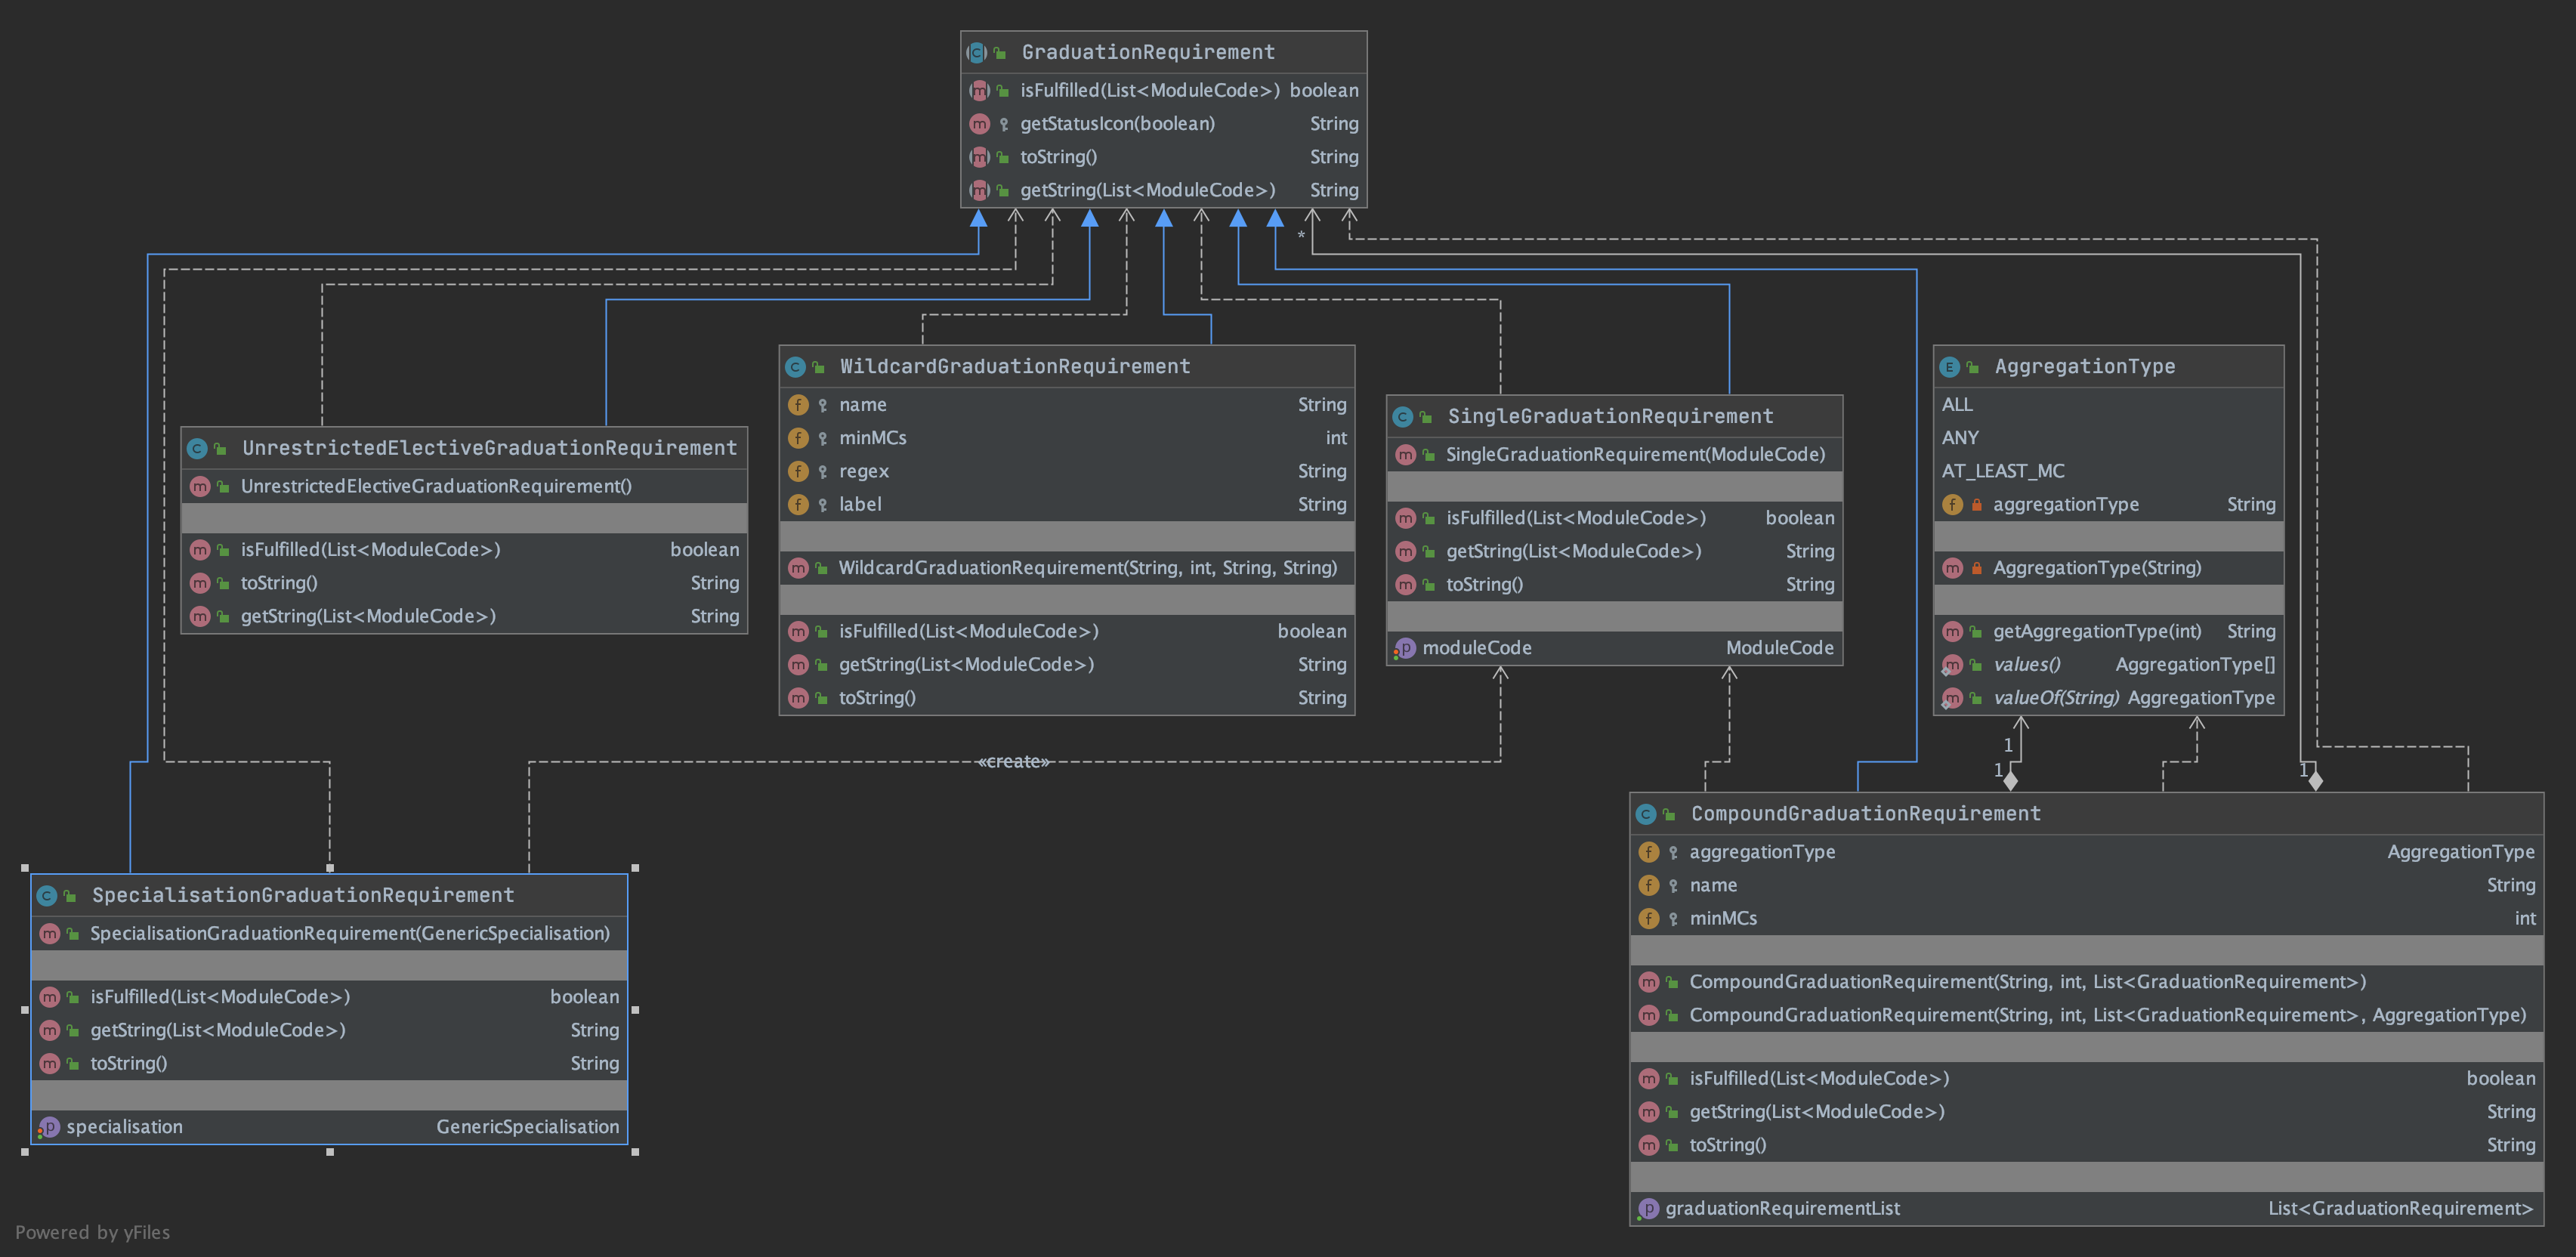
4.3.3. Design Considerations
-
Alternative 1 (Current Implementation): Model real life graduation requirements in an OOP-manner with a different class for different types of requirements containing different logic determining the fulfilment of the graduation requirement, each inheriting from a base class to allow for polymorphism.
-
Pros: Well Structured and separates actual requirements from the model by creating classes that provide the logic needed for fulfilment calculation.
-
Cons: Each Programme will have to construct it’s own combination of the various implementations
GraduationRequirementto model actual graduation requirements.
-
-
Alternative 2: Implement each
DegreeProgram's graduation requirement as a class on it’s own.-
Pros: Each
DegreeProgramcan have the flexibility of customising fulfilment logic. -
Cons: Duplicate codes due to many classes may have the same fulfilment logic, but different data.
-
4.4. Lesson Features
The Lesson Feature allows students to manage the their respective lessons for the academic planning. When managing lessons, they are rendered in a Lesson View Screen in the GUI.
4.4.1. Lesson Implementation
The Lesson entities are automatically created and populated through the JSON data received from NUSMods. Furthermore, Lesson entities are coupled to Module entities in a *..1 relationship.
This coupling allows us to detect if a student tries to add duplicate Lesson entities and perform error handling or alternative advisement, where possible.
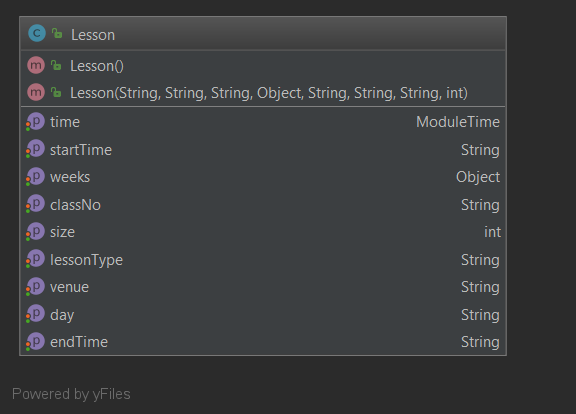
Lesson ImplementationThe attributes of the Lesson class are retrieved from the serialised JSON file.
This implementation consist of 3 commands.
-
LessonAdd- Finds the lessons from the module and add it into the list of lessons for the active student. -
LessonList- List down the lessons for the active student. -
LessonRemove- Remove the lessons from the active student based on the provided index.
4.4.1.1. Adding of Lesson
The LessonAddCommandParser method is called and it will get the ModuleCode and Semester provided by the arguments. It will run the LessonDataImporterUtil class run method to convert the json file to Lesson Object. This is then added to the active student on the planner.
4.4.1.2. Listing of Lesson
The LessonListCommand method is called and it will iterate through the list of Lesson that is associated with the active student in the planner.
4.4.1.3. Deleting of Lesson
The LessonRemoveCommandParser method is called and it will get the Index provided by the arguments. It will retrieve the list of Lesson and delete the object based on the index given.
4.4.2. Design Considerations
-
Alternative 1 (Current Implementation): Letting the users decide the lesson they want.
-
Pros: Allows for flexibility as it can reuse some of the code written for modules to adapt for lessons.
-
Cons: More checks are needed to ensure user do not key in invalid values
-
-
Alternative 2: Hard code to take the first option of each lesson.
-
Pros: Easier logic for the developer. Less bugs to deal with.
-
Cons: Inconvenient for the user and does not allow the flexibility to choose the lesson that they want to take.
-
4.5. Module Features & Database
Bulk of the sections (of Section 4, “Implementation”) and features throughout, require heavy interaction with the Module entities. Modules form the majority of what students will need to interact with, as these are the classes they must take and clear, in order to graduate.
4.5.1. Module Implementation
The Module entities are automatically created and populated through the JSON data received from NUSMods. The following class diagram below shows all the values that the Module entity stores or is associated with:
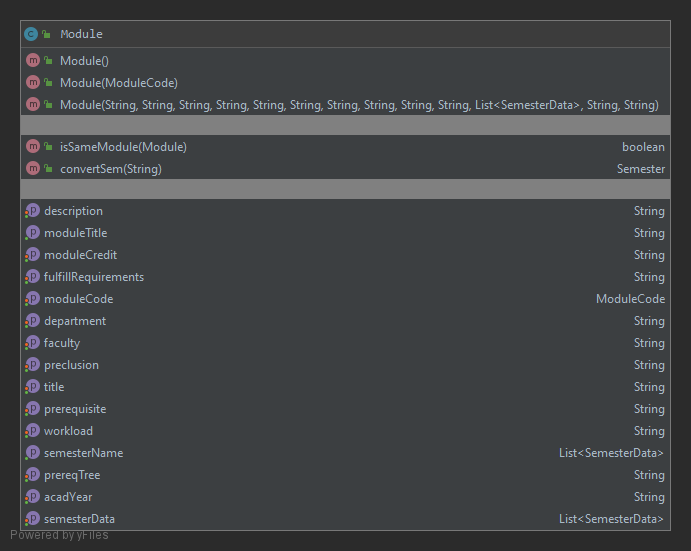
Module ImplementationThe attributes of the Module class are retrieved from the serialised JSON file.
Additionally, Module entities can be marked as exempted which allow Students to declare in the application, that will get the module credits associated, without having to declare taking it or associate a Grade.
4.5.2. Module Search
On First Launch, all the modules that are available in NUS (in accordance to NUSMods data) is populated into the Module Panel Screen. This allows a student to select modules and view the corresponding module descriptions and details.
Students are able utilise the "Search Bar" to search for any module based on the module code or module name. When given the query with the corresponding values, the following logic takes place:
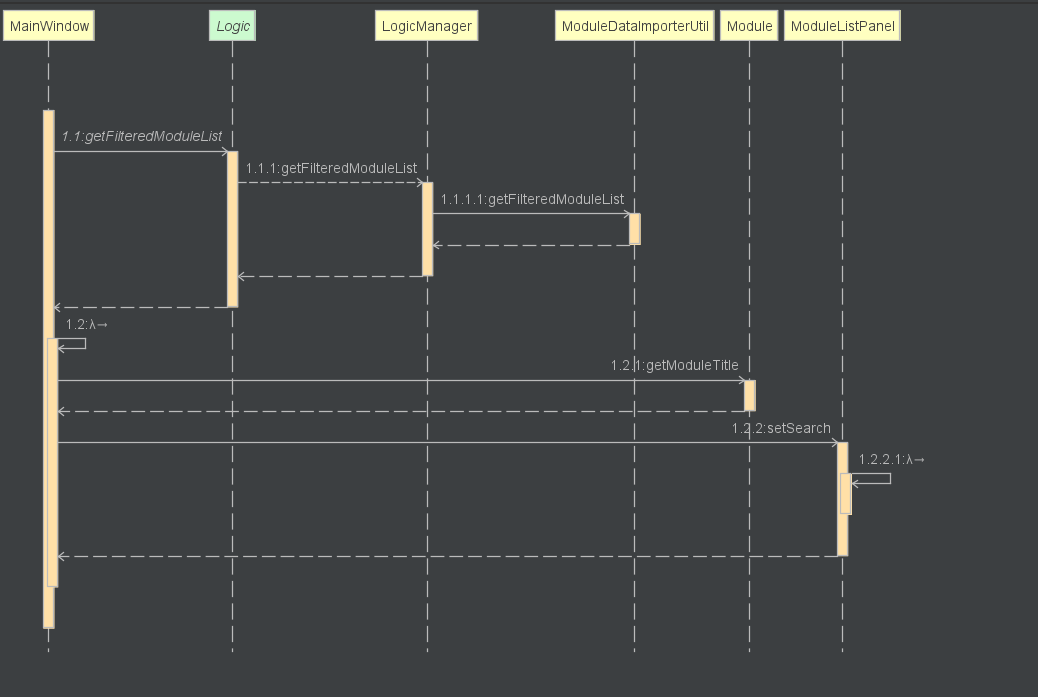
If any results match the query enetered, they are populated into the Search Screen GUI for the user.
4.5.3. Design Considerations
-
Alternative 1 (Current Implementation): Using streams to collect the modules and search
-
Pros: Less mutability as the modules will not be accidentally modified.
-
Cons: Hard to debug when there is a bug.
-
-
Alternative 2: Loop and search each modules.
-
Pros: Lightweight using a for loop.
-
Cons: Modules may be accidentally modified if it is not protected properly.
-
4.6. Planner Model
(Vincent wrote this section "Planner Model" below)
The Planner class stores information about the App’s state.
Many operations of the Planner must be inherently stateful because user operations include selecting students and timetables,
which are then also known as the 'active student' and 'active timetable', respectively.
These selection operations affect which students and timetables future operations use.
The App needs access to the list of students, the selected student, and the selected timetable of the selected student need to be stored.
As described in Student Model (in Model Component), the Student stores information related to the timetables it has, which stores the enrollments for each timetable. The Planner only needs to retain indices/keys to the active student and semester.
Therefore, Planner stores information including:
-
UniqueStudentList : students, which is the list of students in the planner.
Uniqueness (usingStudent#isSameStudent) of the students is enforced. This prevents two students from having the same name. -
int : activeStudentIndex, an index for the currently selectedStudent.
This index refers to a valid student exactly when the index is within the bounds of thestudentslist.
Therefore, no student is selected if the index is out of bounds of thestudentslist. -
StudentSemester : activeSemester, which corresponds to the currently selectedTimeTablefor the currently selectedStudent. This isnullwhen there is no active timetable selected.
ThePlannermust have a validStudentselected in order to have a non-nullactiveSemester, which is an invariant enforced byPlanner#getActiveTimeTable()
All of these fields have the protected access modifier to hide and encapsulate the data. To access this data, the following methods are used by the Model:
-
Student getActiveStudent()to get the activeStudent.
Note that the activeStudentis not stored directly, but with an indexactiveStudentIndexas previously mentioned. -
Student getActiveSemester()to get the activeStudentSemestercorresponding to the active timetable. -
TimeTable getActiveTimeTable()to get the activeTimeTable.
This throws aNoActiveStudentExceptionexception if aStudentis not already selected.
Note that the activeTimeTableis not stored directly, but withactiveSemesteras previously mentioned.
The following methods change which student or timetable is selected:
-
void activateStudent(Student student)selects thestudentin thePlanner
This throws aStudentNotFoundExceptionexception if thestudentis not in thePlanner.
Note that the student is considered the same as another student in the list ifStudent#isSameStudent()returnstrue. This allows activation of a student after its timetable is changed. -
void activateSemester(StudentSemester semester)selects the timetable corresponding tosemesteras the active timetable.
This throws aNoActiveStudentExceptionexception if aStudentis not already selected. -
void activateValidStudent()andvoid activateValidSemester()are similar, but may select any arbitrary valid student and timetable respectively.
The following methods replace values stored by the student list:
-
void setStudents(List<Student> students)replaces the student list entirely. This does not reset the active student or active timetable, which may become invalidated.
Make sure to usePlanner#activateStudent(null)if you wish to reset this too. -
void replaceActiveStudent(Student student)replaces the currently selectedStudentwith the specifiedstudentin the student list. -
void replaceActiveTimeTable(TimeTable timeTable)replaces the currently selectedTimeTablewith the specifiedtimeTablein the selected student’sTimeTableMap.
Many further methods modify properties of the selected student and timetable. Some examples are:
-
void addExemptedModule(ModuleCode moduleCode)which adds an exempted module with the givenmoduleCodeto the active student. -
void addSemesterTimeTable(StudentSemester studentSemester)which adds a timetable to the selected student using the specifiedstudentSemester. -
void removeEnrollment(ModuleCode moduleCode)which removes an enrollment with the givenmoduleCodefrom the selected timetable.
Avoid storing references to, and avoid directly calling methods with mutate Student or Planner objects retrieved from Planner or Model, as Student is mutable.Consider using the methods of Model directly to interact with the Model instead.
|
4.6.1. Design Considerations
4.6.1.1. Aspect: Mutability of data stored in Planner
-
Alternative 1: (current choice)
Plannerstores references to mutableStudentobjects which store mutableTimeTableobjects.
Mutation ofStudentobjects is allowed, but only through getter/setter methods.-
Pros: Mutability of
Studentenables developers to directly modify aStudentdirectly with its methods. This is very convenient and decouples the implementation ofStudentfrom the implementation ofPlanner.
This also makes implementation ofPlannersignificantly easier, especially due to the nesting of data structures. -
Cons: There are no guarantees of immutability, and operations which mutate a
Studentcan affect thePlanner. ThePlanneris unable to observe any changes made to theStudentobject stored.
-
-
Alternative 2:
Plannerstores a list of immutableStudentobjects, which also store immutableTimeTableobjects.-
Pros: Immutability of the
Studentobjects is enforced. Accidental mutation of a storedStudentusing a reference is not possible without using methods of thePlanner. -
Cons: Making modifications to a stored
Studentwould require the instantiation of a new modified copy.
All involved classes (Planner,Student,TimeTableMap,TimeTable, etc.) would have to implement methods to mutate the required fields.
-
4.7. Student Features
(Vincent wrote the section "Student Features" below)
The Student Feature allows users to manage multiple academic plans, add and remove enrollments, and check their degree progression and grades.
As described in Student Model (in Model Component), the Student stores information related to the timetables it has, which in turn stores the enrollments for each timetable. This section will focus on the management of Student using commands provided to the user.
As users may want to do multiple operations on the same student, the user can select one student as the 'active student'.
Many commands then operate on the 'active student'. Certain commands (such as "student active" and "student remove") can cause the 'active student' to be deselected. How this is stored is described in more detail in Planner Model.
The following sequence diagram shows how the StudentAddCommand works by showing interactions
within the Model component when
Logic#execute("student add n/Alice major/CS") is called.
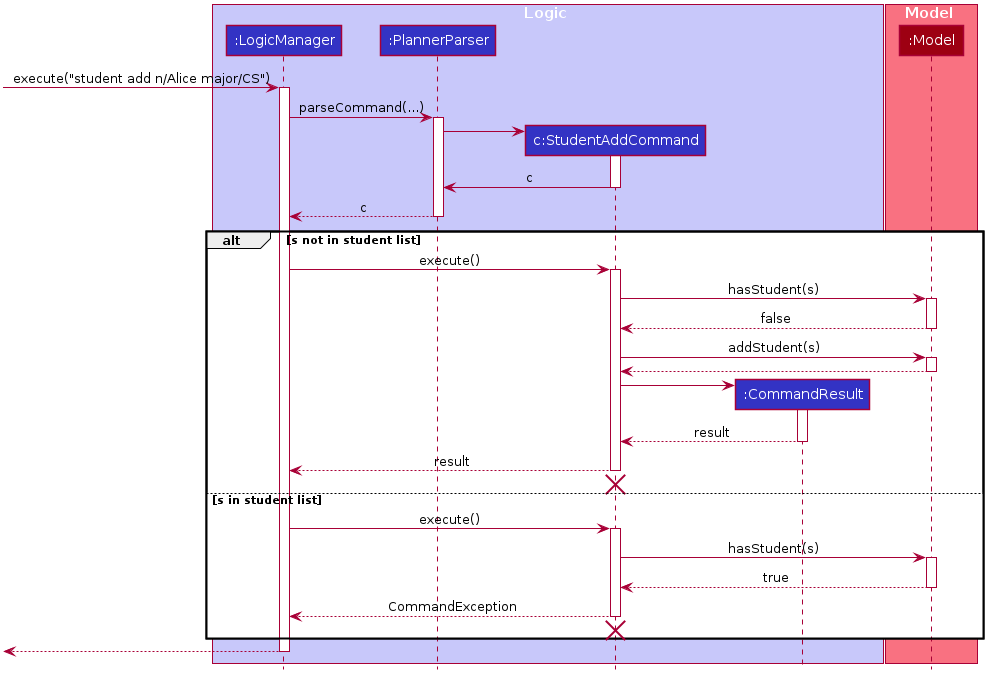
StudentAddCommand
The lifeline for StudentAddCommand should end at the destroy marker (X). However, due to a limitation of PlantUML, the lifeline reaches the end of diagram.
|
For brevity, the Student that the StudentAddCommand was constructed with is denoted as "s".The actual parsing (i.e. PlannerParser calling StudentCommandParser which calls StudentAddCommandParser) is omitted for clarity.For brevity, the parameter of PlannerParser#parseCommand() (which is just "student add n/Alice major/CS") is also omitted.
|
"Active student" and "selected student" are used interchangably to refer to the student the user has selected with the "student active" command.
|
4.7.1. Student Management
The user may add, remove, select and list students with the "student add", "student remove", "student active" and "student list" command strings, respectively.
These correspond to the StudentAddCommand, StudentRemoveCommand, StudentActiveCommand and StudentListCommand classes.
These sub-commands are parsed by the Student*CommandParser sub-command parsers, with the exception of StudentListCommand which is directly returned by StudentCommandParser.
Refer to Sub-Commands to see how Student*CommandParser are invoked by StudentCommandParser.
The sub-commands "remove" and "active" for the "student" command both require a unsigned positive integer "INDEX" in the command string.
No arguments are allowed because they will be interpreted as being part of the "INDEX" string.
Similarly, the "add" sub-command allows exactly "n/NAME major/MAJOR" in its parameters.
This can be explained by ArgumentTokenizer.tokenize() only splitting arguments using the prefixes provided to it.
Therefore, the commands correctly reject prefixes not specified in the command usage text, although the error message can be confusing
since the user might expect that all prefixes are split before validation.
Then, Student*Command objects are created and returned by the Student*CommandParser#parse().
* For the "student add" command, StudentAddCommand is constructed with a new Student object created from the "NAME" and "MAJOR" arguments provided.
* For the "student remove" and "student active" commands, the Student*Command is constructed with an Index object representing the "INDEX" argument provided.
4.7.1.1. Adding a Student
When the user enters the "student add" command, StudentAddCommand#execute(Model model) is executed. The following steps occur:
-
Checks if the
student : Studentis present in theModelusingModel#hasStudent(Student).-
If so, then a
CommandExceptionis thrown.
-
-
Otherwise, Add the
studentto theModelusingModel#addStudent(Student). -
Generate success message and return a
CommandResult.
4.7.1.2. Listing Students
When the user enters the "student list" command, StudentListCommand#execute(Model model) is executed.
The list of students is obtained with Model#getStudentList(). The list of students is then formatted into a newline-separated, numbered list string,
which is used in the success message.
This operation cannot fail in any valid Planner state.
|
4.7.1.3. Removing and Selecting a Student
When the user enters the "student remove" or the "student active" command, Student*Command#execute(Model model) (corresponding to the sub-command) is executed.
The following steps occur:
-
The
Indexsupplied to theStudent*Commandconstructor is checked if it is in the bounds of the student list by comapring withModel#getStudentList().size().-
If not, a
CommandExceptionis thrown with theMessages.MESSAGE_INVALID_STUDENT_DISPLAYED_INDEXtext.
-
-
The
Studentcorresponding to theIndexis retrieved usingModel#getStudentList().get(int).-
For a
StudentRemoveCommand,Model#removeStudent(Student)is called to remove the student.
By removing the reference to theStudentin the list of students inPlanner, all data related to the student is hence removed. -
For a
StudentRemoveCommand,Model#activateStudent(Student)is called to select the student.
-
4.7.2. Design Considerations
-
Alternative 1: (current choice)
Studentis mutable.-
Pros: Very convenient for developers to change
Studentobjects imperatively. -
Cons: If references of the
Studentobject are retained and then mutated unintentionally, theStudentobject in thePlannerwill also be mutated.
Hence, developers need to be careful about calling methods which mutate theStudentobject. This increases coupling betweenStudentandPlanner.
-
-
Alternative 2:
Studentis immutable.-
Pros: Immutability is guaranteed. Accidental mutation of the
Plannercannot occur with any stray references. -
Cons: Mutating nested data structures in the
Studentobject (e.g. a singleGradeof anEnrollmentstored in aTimeTableof theStudent) can be very messy. To mutate such data,Studentor the caller needs to know about the implementation details of all involved nested classes (e.g.TimeTableMap,StudentSemester,TimeTable,Enrollment, etc.), which increase coupling significantly.
An alternative is thatModelandPlannerimplements all the required mutation methods, handling said dependencies. This increases implementation complexity massively.
-
-
Alternative 3:
Studentis mutable, but only deep copies ofStudentare returned byModel.-
Pros:
-
Immutability of the
Studentobjects in thePlanneris preserved. Accidental mutation of a returned copy does not result in mutation of the original stored inPlanner.
Developers can use the mutation methods ofStudentdirectly without worrying of mutatingPlanneraccidentally. -
The implementation is also less complex than full immutability.
-
-
Cons:
-
The implementation of a deep copy must be handled carefully to prevent the same reference from being used anywhere in a copied class (and thus only providing a shallow copy).
-
The usage of copies to mutate a
Studentin thePlanneris also not as convenient, because the old copy must be swapped with a new one.
This can become problematic in future operations where the user is allowed to change identity fields (those affectingStudent#isSameStudent()), such as changing the name of the student. Since the new student will have a different name from the original, a different method of identifying students modified will need to be used.
-
-
4.8. Timetable Features
(Vincent wrote the section "Timetable Features" below)
The Timetable Feature allows users to manage timetables across semesters.
"Active timetable" and "selected timetable" are used interchangably to refer to the timetable the user has selected with the "timetable active" command.
|
4.8.1. Timetable Implementation
Each Student stores a TimeTableMap representing the timetables of the student. The TimeTableMap stores a key-value pair mapping a StudentSemester to a TimeTable.
For each TimeTableMap, the StudentSemester keys must be unique. Therefore, there should not be duplicate semester keys.
This corresponds to each semester in the TimeTableMap only having one timetable.
Note that this does not preclude multiple equal (TimeTable#equals()) but not identical (==) TimeTable objects
from being associated to different StudentSemester objects. This happens whenever an empty timetable is added to two different semesters with the "timetable add" command.
A StudentSemester stores a SemesterYear instead of a Semester directly.While storing the academic year ( acadYear) is supported by SemesterYear, it is currently unused in the App’s code.
Only SemesterYear.sem is used for storing the Semester represented.
|
4.8.2. Timetable Management
Using the "timetable add", "timetable remove", "timetable list" and "timetable active" commands, users can manage the timetables of Student objects in the Planner.
4.8.2.1. Listing Timetables
The StudentSemester objects corresponding to the student’s timetables can be listed using the "timetable list" command string.
The TimeTableCommandParser directly creates a TimeTableListCommand object (a subclass of TimeTableCommand), and all preamble and arguments are ignored.
TimeTableListCommand#execute(Model) first checks if there is an active student with Model#hasActiveStudent(). If not, it throws a CommandException with text Messages.MESSAGE_NO_STUDENT_ACTIVE.
Then it gets all StudentSemester keys the selected student has in its TimeTableMap using Model#getStudentSemesters(),
which returns the StudentSemester in chronological order (as defined in StudentSemester#compareTo()).
This ordering is more convenient to the user compared to the arbitrary ordering of internal to TimeTableMap.
This list is then passed to StringUtil.wrapCollection(Collection), which formats the list of StudentSemester into a comma-separated string.
The string is also wrapped for better readability by the user.
4.8.2.2. Specifying Timetables in Add, Remove and Active Commands
The sub-commands "add", "remove" and "active" for the "timetable" command all require the arguments "year/YEAR sem/SEM",
which are the DegreeYear and Semester corresponding to the StudentSemester respectively.
Both arguments are mandatory.
-
If both arguments are missing, a
ParseExceptionwill be thrown with theMESSAGE_USAGEstring of the correspondingTimeTable*Command.
This provides instruction about the specific sub-command for the user. -
If any argument is missing, the
TimeTable*CommandParserwill throw aParseException.
Validation of"YEAR"and"SEM"also occur. If"YEAR"is not a valid degree year (unsigned integer from 1 to 6 inclusive), or if"SEM"is not one of"1", "2", "st1", "st2", then the sub-command parser will also throw aParseException.
Once the command string is parsed, the DegreeYear and Semester will be used to create a StudentSemester, which is passed to the constructor of TimeTable*Command.
4.8.2.3. Adding, Removing and Selecting a Timetable
The TimeTable*Command classes then receive a StudentSemester in its constructor parameter.
-
All
TimeTable*Command#execute(Model)methods first check thatModel#hasActiveStudent() : booleanistrue. This is needed because all these commands require an active student.
Similar toTimeTableListCommand(documented above in Listing Timetables), if there is no active student, aCommandExceptionwill be thrown. -
Further checks may occur for different timetable sub-commands:
-
TimeTableAddCommandchecks if there is no matching semester (withModel#hasSemester()), then adds the timetable withModel#addSemesterTimeTable() -
TimeTableRemoveCommandchecks if there is a matching semester (withModel#hasSemester()), then removes the timetable withModel#removeSemesterTimeTable()
By removing the reference to theTimeTablein theTimeTableMapof the selectedStudent, all data related to the timetable is hence removed. -
TimeTableActiveCommandchecks if there is a matching semester (withModel#hasSemester()), then sets the timetable as active withModel#activateSemester()
-
4.8.3. Design Considerations
4.8.3.1. Aspect: Storage of different timetables across semesters
-
Alternative 1: (current choice)
TimeTableMapis aMap<StudentSemester, TimeTable>-
Pros: Enforces uniqueness of a
TimeTablevalue in theTimeTableMap, as explained earlier. -
Cons:
-
Serialisation of the
TimeTableMapis more complex, requiring conversion toJsonAdaptedTimeTableMap, which is a list ofJsonAdaptedTimeTablePair. Deserialisation ofMap<K,V>cannot happen automatically for custom classesKdue to some limitations of Jackson. -
Ordering of timetables in
TimeTableMap.entrySet()is arbitrary, which may be inconvenient for users.
-
-
-
Alternative 2:
TimeTableMapis aListofPair<StudentSemester, TimeTable>-
Pros:
-
Serialisation of
TimeTableMapis straightforward. -
Ordering of
StudentSemestercan easily be enforced by sorting theTimeTableMapbyStudentSemesterafter every operation.
-
-
Cons: Uniqueness constraint will have to be enforced by ensuring that insertions and deletions with a given
StudentSemesterkey do not cause duplicateStudentSemesterobjects.
-
5. Backend & Debugging
5.1. Configuration
Certain properties of the application can be controlled (e.g user prefs file location, logging level) through the configuration file (default: config.json).
5.2. JSON Handling & Module Data Management
As mentioned in several sections (of Section 4, “Implementation”) above, NUS Module Planner has the capability to pull live data for entities, such as, Major and Module, via JSON.
JSON stands for JavaScript Object Notation and is a lightweight format for storing and transporting data. We choose this syntax as it is "self-describing" and thus, human-readable and easy to understand, while keeping our application size low.
Jackson is a standard JSON library for Java that contains a suite of data-processing tools, including JSON parsers and generators. Jackson is used for the JSON-related operations mentioned below.
The original schema of the JSON file came from NUSMods via version 2 of their API available here. The endpoints we used are:
-
/{acadYear}/moduleInfo.json -
/{acadYear}/modules/{moduleCode}.json
The Academic Year (acadYear) used is: 2019/2020.
From the JSON responses of the above API endpoints, we created several classes to help convert the JSON representation of the object into a working Java Object that the application can use, as well as the other direction which is used to stored the current state of the Planner in a JSON file.
Such classes include:
-
JsonSerializableLesson -
JsonSerializableModule -
JsonSerializablePlanner -
JsonSerializableSemesterData
The ModuleDataImporterUtil is used to parse the raw JSON files containing Module information and convert them into JsonSerializableModule objects which contain various attributes such as a list of JsonSerializableSemesterData.
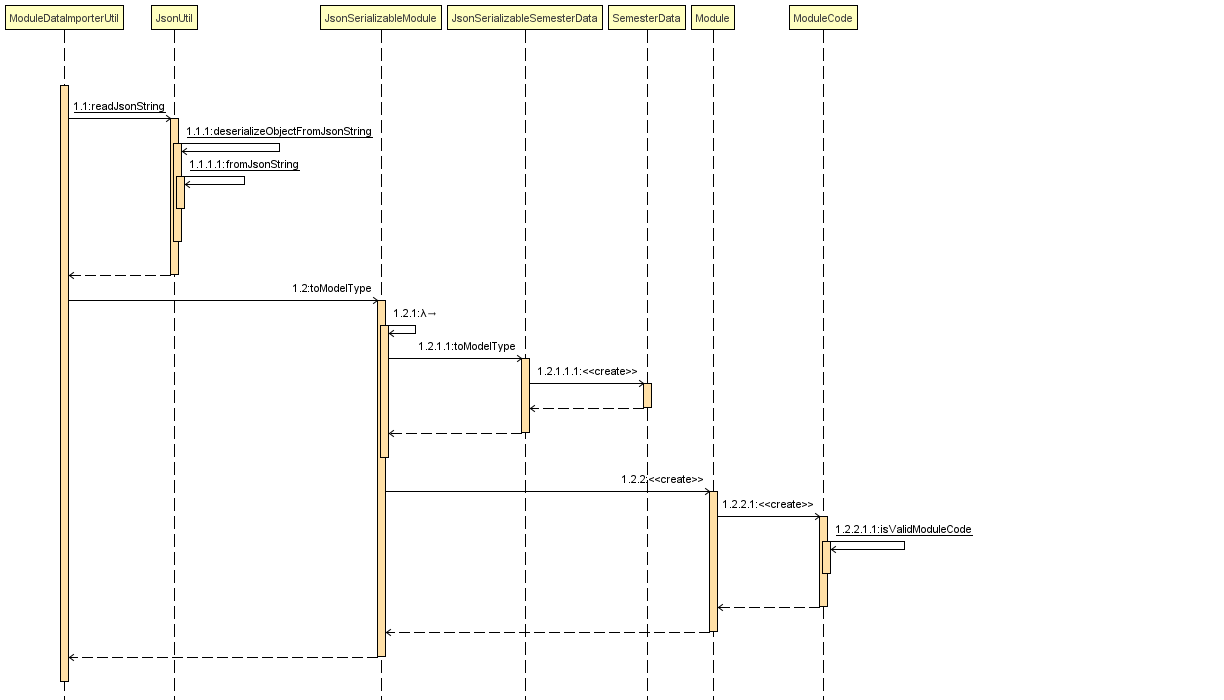
run operation in ModuleDataImporterUtilThe LessonDataImporter is used to parse the raw JSON files containing Module-specific Lesson information and convert them into JsonSerializableModule objects which contain various attributes such as a list of JsonSerializableLesson.
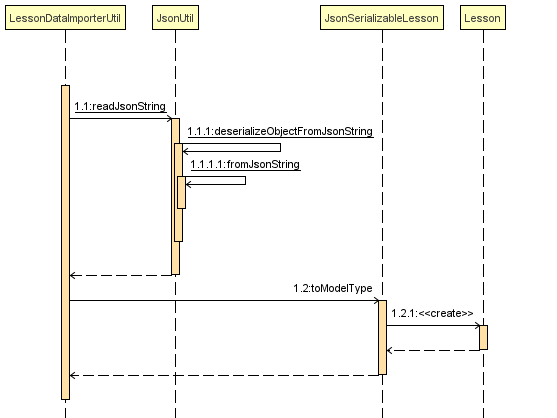
run operation in LessonDataImporterThe following classes are used to convert objects of various classes (such as Module, Lesson, Student) into Jackson-friendly versions.
-
JsonAdaptedEnrollment -
JsonAdaptedGrade -
JsonAdaptedLesson -
JsonAdaptedModule -
JsonAdaptedModuleCode -
JsonAdaptedSemesterData -
JsonAdaptedSemesterYear -
JsonAdaptedStudent -
JsonAdaptedStudentSemester -
JsonAdaptedTimeTable -
JsonAdaptedTimeTableMap -
JsonAdaptedTimeTablePair
When saving the Planner, JsonSerializablePlanner is used to store all the various attributes of the Planner in a JSON-compatible format, such as list of Student objects, currently active Student index, and currently active SemesterYear.
5.3. Logging
We are using java.util.logging package for logging. The LogsCenter class is used to manage the logging levels and logging destinations.
-
The logging level can be controlled using the
logLevelsetting in the configuration file (See Section 5.1, “Configuration”) -
The
Loggerfor a class can be obtained usingLogsCenter.getLogger(Class)which will log messages according to the specified logging level -
Currently log messages are output through:
Consoleand to a.logfile.
Logging Levels
-
SEVERE: Critical problem detected which may possibly cause the termination of the application -
WARNING: Can continue, but with caution -
INFO: Information showing the noteworthy actions by the App -
FINE: Details that is not usually noteworthy but may be useful in debugging e.g. print the actual list instead of just its size
5.4. Sub-Commands
(Vincent wrote the section "Sub-Commands" below)
Central to the command syntax of the App is the organisation of commands into sub-commands.
Commands such as "student" show the relevant instructions for how to use its sub-commands, such as "student add".
This organisation of commands into a hierarchy improves usability by the user, and the organisation of the command implementations into packages.
Many commands of the App are organized into 'parent commands', such as "student".
Its sub-commands are known as 'child commands' (e.g. "student add").
'Parent commands' must have a corresponding Parser and a Command.
For example,
the corresponding Parser subclasses for the "student" command and its sub-commands are in the
parser.student package,
while the Command subclasses are in the
commands.student package.
Note that for a sub-command (e.g. "student add"), the 'parent command' parser only parses the command word for the 'parent command' (e.g. "student"), while the 'child command' only parses the command word for its sub-command (e.g. "add").
The following sequence diagram shows the interaction between the *Command and *CommandParser classes of 'parent commands' and 'child commands' when a command string is parsed.
The 'parent command' is denoted as "X", while the 'child command' is denoted as "Y". The corresponding Command and Parser classes have been named accordingly.
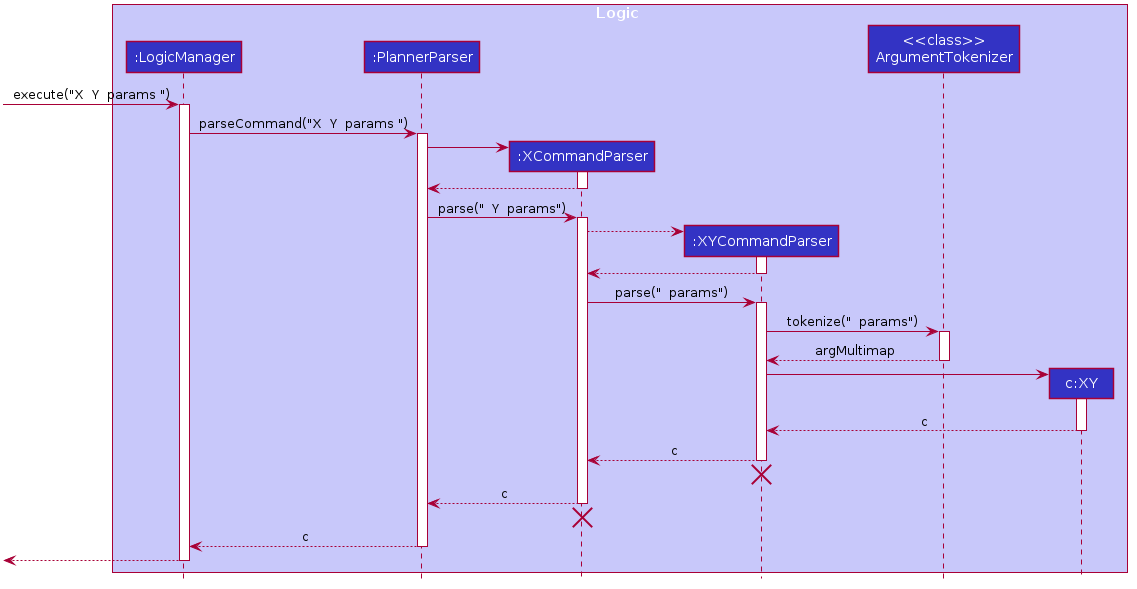
The lifeline for XCommandParser and XYCommandParser should end at the destroy marker (X) but due to a limitation of PlantUML, the lifeline reaches the end of diagram.
|
5.4.1. Parent and child command classes
The 'parent command' class (e.g. StudentCommand) should be declared abstract, and directly extend the Command class.
All sub-command classes should then extend the 'parent command' class (e.g. StudentAddCommand extends StudentCommand).
Similar to non-hierarchical commands, 'parent command' classes may contain the fields COMMAND_WORD and MESSAGE_USAGE
for use in the corresponding 'parent command' parsers. This decouples the message details of the command from the parsing of the commands.
5.4.2. Parent command parser class
'Parent command' parsers are required to dispatch parsing to a sub-command. This is somewhat similar to the main PlannerParser.
However, the splitting of the sub-command string into the sub-command name and its arguments
is handled by SubCommandSplitter.java.
This utility class handles some edge cases related to whitespace, and is preferred when implementing a 'parent command'.
The Parser for the 'parent command' (e.g. StudentCommandParser) should implement the Parser<T> interface,
where T is the class of the 'parent command' (e.g. StudentCommand).
This is different from child Command classes, which should extend their parent Command class
|
To split the sub-command string into the sub-command and arguments, use:
-
SubCommandSplitter(String userInput, String failureMessage)to construct theSubCommandSplitterobject -
SubCommandSplitter#getCommand()to get the command string -
SubCommandSplitter#getSubCommand()to get the arguments.
Note that it is possible to create a more deeply nested hierarchy of commands subclassing theCommandsubclass appropriately.
Parsing of a hierarchical command string (e.g."student add n/Alice major/CS") happens in the following manner:
-
PlannerParserremovesstudentfrom the command string. A leading space followed by"add n/Alice major/CS"is passed toStudentCommandParser. -
StudentCommandParserinvokes methods inSubCommandSplitterwhich parses the remaining command string into the"add"command word and"n/Alice major/CS"as the arguments. -
StuentCommandParsermatches the"add"string and creates a newStudentAddCommandParserwith the input string"n/Alice major/CS". -
StudentAddCommandParsercan now parse the given preamble and arguments usingArgumentTokenizer
5.4.3. Child command parser class
'Child command' parsers should implement Parser<T>, where T is the 'child command' class.
'Child command' parsers are responsible for parsing the preamble and arguments of the input.
It is not always necessary to create a parser for a 'child command'.
If the 'child command' may ignore any given preamble or arguments provided by the user,
the 'parent command' parser may simply return an instance of the 'child command' directly.
For example, StudentCommandParser directly returns a StudentListCommand given the "list" command word.
6. Documentation
Refer to the guide here.
7. Testing
Refer to the guide here.
8. Dev Ops
Refer to the guide here.
9. Proposed Future Enhancements
NUS Module Planner has a lot more potential to grow!
Below are some of the other great features we think can be implemented in v2.0 onward:
-
Module Viewer with Search - Other than just searching for modules, search for their content instead, such as modules that deal with Heat Transfer or Geology.
-
Timetable Planner with Friends - Instead of just viewing timetables of different students (i.e. friends) separately, be able to overlay them in one "Timetable View", for easier group planning.
-
Requirements Double-Upper - Instead of just one
Major, handle doubleMajorprogramme students, or even those with Minors. -
Module Popularity Prediction - Get and analyse historic data from NUSMods about module uptake, so that students do not have to plan for modules that would be overly subscribed.
-
Support for Overseas Exchange and University Town College Programmes - Be able to plan for special modules only offered in these programmes, if a student is enrolled in them.
-
Live Module Data - Get the latest Module Data available from NUS Mods and plan your Semester before it starts.
-
Module Data History - View historical data on Module enrollments and decide if when you want to take a certain
Module.
Appendix A: Product Scope
A.1. Target User Profile
-
targets prospective, incoming and current Undergraduate NUS Students
-
needs to plan/track academic progression via enrolling and passed modules
-
prefer desktop apps over other types
-
can type fast
-
prefers typing over mouse input
-
is reasonably comfortable using CLI apps
A.2. Value Proposition
-
aggregates all information regarding modules and graduation requirements in a single app
-
manages academic progress and module planning faster than a typical mouse/GUI driven app
Appendix B: User Stories
Priorities: High (must have) - * * *, Medium (nice to have) - * *, Low (unlikely to have) - *
| Priority | As a … | I want to … | So that I … |
|---|---|---|---|
|
freshman |
declare what my major is |
get the right graduation requirements to follow |
|
freshman |
declare what I am exempted from (e.g. Polytechnic Exemptions) |
am not recommended modules that I am exempted from |
|
freshman |
declare what tracks/specializations (Focus Areas) I am interested/am taking |
am given recommendations that will fulfill the requirements of that track/specialization |
|
current undergraduate student |
view the list of modules which I have taken |
can remember what modules I have taken |
|
current undergraduate student |
view the list of modules which I have declared exempted from |
can remember what modules I am exempted from |
|
freshman |
see a list of all available modules in NUS |
can see what modules is available for me to take |
|
current undergraduate student |
enter the grades I got for each module |
can view my Cumulative Average Point (CAP) for each and all semesters |
|
current undergraduate student |
can see if a module is being offered in a semester that I want |
can plan my academic plan correctly |
|
current undergraduate student |
see the list of grades I obtained for each module |
can have a better understanding of my academic performance |
|
current undergraduate student in-residence |
declare that I am part of a Residential College program |
am given recommendations that take into account UTCP modules |
|
current undergraduate student |
declare my intention of overloading modules |
am given recommendations to graduate faster |
|
current undergraduate student |
declare my intention of underloading modules |
am given recommendations to graduate faster |
|
freshman |
verify if I can graduate on time given currently selected modules |
am given recommendations of feasible modules to take |
|
current undergraduate student |
check which lecturer is teaching the module |
can decide if I should take that module in that semester |
|
current undergraduate student with NOC acceptance |
declare that I am part of NOC programme |
can count NOC modules towards my graduation requirements |
|
current undergraduate student with USP acceptance |
declare that I am part of the university scholar programme |
can replace my requirements for graduation with USP modules |
|
current undergraduate student |
can check the venue of the class |
can plan my traveling route during module planning |
|
current undergraduate student |
change the colours of the module planner for customizable |
can enjoy dark theme |
|
current undergraduate student on internship |
declare when I would like to undergo an internship |
can plan the timing of my modules |
|
current undergraduate student |
view changes in Grade Point Average (GPA) according to projected grades |
can have a better understanding of my academic performance |
|
freshman |
automatically select non-conflicting lecture and tutorial slots based on preferences |
can create usable timetables based on my preferences |
|
current undergraduate student on exchange |
set the module to be non graded to pass or fail |
can set the overseas module to be pass or fail without affecting my CAP |
|
freshman |
declare what my minor(s) is/are |
get the right graduation requirements to follow |
|
current undergraduate student |
see which pathways would be more challenging (i.e. Level 3K, 4K, 5K modules) |
can choose a better course pathway in terms of maximising GPA/fulfilling course requirements |
|
freshman |
set preferences (e.g. ‘free’ days/only after 12 PM) in order to automatically organise the timetable |
have an efficient and personalised timetable |
Appendix C: Use Cases
For all use cases below, the System is the Planner and the Actor is the user, unless specified otherwise.
| The following Use Case guidelines do not take into account Edge Cases, which we acknowledge are not handled. Instead, please keep a look out for the pre-definied scopes as stated in each Unit Test Case below. |
C.1. Use Case: Add Plan (UCA01)
MSS
-
User requests to add a plan
-
User supplies plan name and plan major
-
Planner adds the plan
Use case ends.
Extensions
-
2a. Any of the plan or major is missing or invalid
-
2a1. Planner shows an error message
Use case ends.
-
C.2. Use Case: Delete Plan (UCA02)
MSS
-
User requests to list plans
-
Planner shows a list of plans
-
User requests to delete a specific plan in the list
-
Planner deletes the plan
Use case ends.
Extensions
-
2a. The list is empty
Use case ends.
-
3a. The given index is invalid
-
3a1. Planner shows an error message
Use case resumes at step 2.
-
C.3. Use Case: Select Plan (UCA03)
MSS
-
User requests to list plans
-
Planner shows a list of plans
-
User requests to select a specific plan in the list
-
Planner selects the plan as the active plan
Use case ends.
Extensions
-
2a. The list is empty
Use case ends
-
3a. The given index is invalid
-
3a1. Planner shows an error message
Use case resumes at step 2.
-
C.4. Use Case: Add Timetable (UCB01)
MSS
-
User selects a plan (UCA03)
-
User requests to add a timetable
-
User specifies semester of the timetable
-
Planner adds the timetable to the active plan
Use case ends.
Extensions
-
2a. There is no plan currently selected
-
2a1. Planner shows an error message
Use case ends.
-
-
3a. The given semester is invalid
-
3a1. Planner shows an error message
Use case ends.
-
C.5. Use Case: Delete Timetable (UCB02)
MSS
-
User selects a plan (UCA03)
-
User requests to list timetables
-
Planner shows a list of timetables of the active plan
-
User specifies a corresponding semester for a timetable to delete
-
Planner deletes the timetable from the active plan
Use case ends.
Extensions
-
2a. There is no plan currently selected
-
2a1. Planner shows an error message
Use case ends.
-
-
4a. The given semester is invalid
-
4a1. Planner shows an error message
Use case resumes at step 3.
-
C.6. Use Case: Select Timetable (UCB03)
MSS
-
User selects a plan (UCA03)
-
User requests to list timetables
-
Planner shows a list of timetables of the active plan
-
User requests to select a specific timetable in the list
-
Planner selects the timetable as the active timetable
Use case ends.
Extensions
-
2a. The list is empty
Use case ends.
-
4a. The given semester is invalid
-
4a1. Planner shows an error message
Use case resumes at step 3.
-
C.7. Use Case: Add Module (UCC01)
MSS
-
User selects a timetable (UCB03)
-
User requests to add a specified module
-
Planner adds the module to the active timetable
Use case ends.
Extensions
-
2a. The given module is invalid
-
2a1. Planner shows an error message
Use case ends.
-
-
2b. The given module already exists in the timetable
-
2b1. Planner shows an error message
Use case ends.
-
C.8. Use Case: Delete Module (UCC02)
MSS
-
User selects a timetable (UCB03)
-
User requests to delete a specified module
-
Planner deletes the module from the active timetable
Use case ends.
Extensions
-
2a. The given module is invalid
-
2a1. Planner shows an error message
Use case ends.
-
-
2b. The given module does not exist in the timetable
-
2b1. Planner shows an error message
Use case ends.
-
C.9. Use Case: List Grades (UCD01)
MSS
-
User selects a plan (UCA03)
-
User requests to list grades
-
Planner lists the total number of grades, and cumulative statistics
Use case ends.
Extensions
-
2a. The user requests to list all modules taken instead
-
2a1. Planner lists all modules taken with their respective grades instead
Use case ends.
-
C.10. Use Case: Set Module Grade (UCD02)
MSS
-
User selects a timetable (UCB03)
-
User requests to set the grade of a specified module
-
Planner sets the grade of the specified module
Use case ends.
Extensions
-
2a. The given module is invalid
-
2a1. Planner shows an error message
Use case ends.
-
-
2b. The given module does not exist in the timetable
-
2b1. Planner shows an error message
Use case ends.
-
-
2c. The given grade is invalid
-
2c1. Planner shows an error message
Use case ends.
-
C.11. Use Case: Add Lesson (UCE01)
MSS
-
User selects a timetable (UCB03)
-
User requests to add a specific lesson for a module
-
Planner adds the lesson to the active timetable
Use case ends.
Extensions
-
2a. The given module is invalid
-
2a1. Planner shows an error message
Use case ends.
-
-
2b. The given lesson number is invalid
-
2b1. Planner shows an error message
Use case ends.
-
-
2c. The given semester is invalid
-
2c1. Planner shows an error message
Use case ends.
-
C.12. Use Case: Delete Lesson (UCE02)
MSS
-
User selects a timetable (UCB03)
-
User requests to delete a specified lesson
-
Planner deletes the lesson from the active timetable
Use case ends.
Extensions
-
2a. The given index is invalid
-
2a1. Planner shows an error message
Use case ends.
-
Appendix D: Non-Functional Requirements
-
Should be able to run on all major operating systems (i.e. Windows 10, macOS Catalina, and Ubuntu 18.04 LTS), with
Java 11(as per constraints). -
Should come prepackaged with pre-populated NUSMods data (for offline use).
-
Should be able to accommodate any Computer Science or Information System Undergraduate Students from NUS.
-
Should be able to hold up to 10 students, and their respective module plans/enrollments without a noticeable sluggishness in performance for typical usage.
-
A user with above average typing speed for regular English text (i.e. not code, not system admin commands) should be able to accomplish most of the tasks faster using commands than using the mouse.
Appendix E: Glossary
Appendix F: Product Survey
Pros:
-
Available for offline use
-
Highly-personalisable, with freedom to arrange modules and semesters wherever
Cons:
-
Relies on another third-party application (i.e. Microsoft Excel) to run
-
Extremely tedious to use, and requires some knowledge as a Microsoft Excel power user
Appendix G: Instructions for Manual Testing
Given below are instructions to test the app manually.
These instructions only provide a starting point for testers to work on; testers are expected to do more exploratory testing.
| The following Manual Testing guidelines do not take into account Edge Cases, which we acknowledge are not handled. Instead, please keep a look out for the pre-definied scopes as stated in each Test Case below. |
G.1. Launch and Shutdown
-
Initial launch
-
Download the jar file and copy into an empty folder
-
Double-click the jar file
Expected: Shows the GUI with a set of sample plans. The window size may not be optimal.
-
-
Saving window preferences
-
Resize the window to an optimum size. Move the window to a different location. Close the window.
-
Re-launch the app by double-clicking the jar file.
Expected: The most recent window size and location is retained.
-
G.2. Adding a Plan
-
Adding a plan while all plans are listed
-
Prerequisites: List all plans using the
student listcommand. All plans will be displayed the list. -
Test case:
student add n/Alice major/CS
Expected: Plan is added to the list. Details of the deleted plan are shown in the status message. Timestamp in the status bar is updated. -
Test case:
student add major/CS
Expected: No plan is added. Error details are shown in the status message. Status bar remains the same. -
Other incorrect delete commands to try:
student add,student add n/
Expected: Similar to previous.
-
G.3. Deleting a Plan
-
Deleting a plan while all plans are listed
-
Prerequisites: List all plans using the
student listcommand. All plans will be displayed the list. At least one plan should be listed. -
Test case:
student remove 1
Expected: First plan is deleted from the list. Details of the deleted plan are shown in the status message. Timestamp in the status bar is updated. -
Test case:
student remove 0
Expected: No plan is deleted. Error details are shown in the status message. Status bar remains the same. -
Other incorrect delete commands to try:
student remove,student remove x(where x is larger than the list size),student remove text(wheretextis not a whole number)
Expected: Similar to previous.
-
G.4. Selecting a Plan
-
Selecting a plan while all plans are listed
-
Prerequisites: List all plans using the
student listcommand. All plans will be displayed the list. At least one plan should be listed. -
Test case:
student active 1
Expected: Plan is selected as the active plan. Details of the selected plan are shown in the status message. Timestamp in the status bar is updated. -
Test case:
student active 0
Expected: No plan is selected. Error details are shown in the status message. Status bar remains the same. -
Other incorrect delete commands to try:
student active,student active xyz
Expected: Similar to previous.
-
G.5. Adding a Timetable
-
Adding a timetable while a plan is selected and the selected plan’s timetables are listed
-
Prerequisites: Select a plan using the
student activecommand. A plan will be set as the active plan. Plan should be empty. -
Test case:
timetable add year/1 sem/1
Expected: Timetable is added to the plan. Details of the added timetable are shown in the status message. Timestamp in the status bar is updated. -
Test case:
timetable add year/1 sem/3
Expected: No timetable is added. Error details are shown in the status message. Status bar remains the same. -
Other incorrect delete commands to try:
timetable add,timetable add year/
Expected: Similar to previous.
-
-
Adding a timetable while a plan is selected with an existing timetable of the same semester
-
Prerequisites: Select a plan using the
student activecommand. Add a timetable using thetimetable add year/1 sem/1command -
Test case:
timetable add year/1 sem/1
Expected: No timetable is added. Error details are shown in the status message. Status bar remains the same.
-
G.6. Deleting a Timetable
-
Deleting a timetable while a plan is selected and the selected plan’s timetables are listed
-
Prerequisites: Select a plan using the
student activecommand. A plan will be set as the active plan. Then list timetables withtimetable list. At least one timetable should be listed. -
Test case:
timetable remove year/YEAR sem/SEM(whereYEARandSEMare the year and semester of one of the listed timetables, respectively).
Expected: Specified timetable is deleted from the list. Details of the deleted plan are shown in the status message. Timestamp in the status bar is updated. -
Test case:
timetable remove
Expected: No timetable is deleted. Error details are shown in the status message. Status bar remains the same. -
Other incorrect delete commands to try:
timetable remove year sem,timetable remove year/x(where x is larger than the list size),timetable remove text
Expected: Similar to previous.
-
G.7. Selecting a Timetable
-
Selecting a timetable while a plan is selected and the selected plan’s timetables are listed
-
Prerequisites: Select a plan using the
student activecommand. A plan will be set as the active plan. Then list timetables withtimetable list. At least one timetable should be listed. -
Test case:
timetable active year/YEAR sem/SEM(whereYEARandSEMare the year and semester of one of the listed timetables, respectively).
Expected: Specified timetable is deleted from the list. Details of the deleted plan are shown in the status message. Timestamp in the status bar is updated. -
Test case:
timetable active
Expected: No timetable is selected. Error details are shown in the status message. Status bar remains the same. -
Other incorrect delete commands to try:
timetable active year sem,timetable active year/x(where x is larger than the list size),timetable active text
Expected: Similar to previous.
-
G.8. Adding a Module
-
Adding a module while a timetable is selected and the selected timetable’s modules are listed
-
Prerequisites: Select a timetable using the
timetable activecommand. A timetable will be set as the active timetable. -
Test case:
module add CS2040
Expected: Module is added to the timetable. Details of the added module are shown in the status message. Timestamp in the status bar is updated. -
Test case:
module add text
Expected: No module is added. Error details are shown in the status message. Status bar remains the same. -
Other incorrect delete commands to try:
module add,
Expected: Similar to previous.
-
-
Adding a module while a timetable is selected with the same module existing in the same timetable
-
Prerequisites: Select a timetable using the
timetable activecommand. Add a module using themodule add CS2040command -
Test case:
module add CS2040
Expected: No module is added. Error details are shown in the status message. Status bar remains the same.
-
G.9. Deleting a Module
-
Deleting a module while a timetable is selected and the selected timetable’s modules are listed
-
Prerequisites: Select a timetable using the
timetable activecommand. A timetable will be set as the active timetable. Then list modules withmodule list. At least one module should be listed. -
Test case:
module remove MODULE_CODE(whereMODULE_CODEis one of the listed modules).
Expected: Specified module is deleted from the list. Details of the deleted timetable are shown in the status message. Timestamp in the status bar is updated. -
Test case:
module remove
Expected: No module is deleted. Error details are shown in the status message. Status bar remains the same. -
Other incorrect delete commands to try:
module remove text
Expected: Similar to previous.
-
G.10. Setting the Grade of a Module
-
Setting the grade of a module while a timetable is selected and the selected timetable’s modules are listed
-
Prerequisites: Select a timetable using the
timetable activecommand. A timetable will be set as the active timetable. Then list modules withmodule list. At least one module should be listed. -
Test case:
module grade MODULE_CODE grade/A(whereMODULE_CODEis one of the listed modules).
Expected: Grade of specified module is updated. Details of the deleted timetable are shown in the status message. Timestamp in the status bar is updated. -
Test case:
module grade
Expected: Module grade is not updated. Error details are shown in the status message. Status bar remains the same. -
Other incorrect delete commands to try:
module grade text
Expected: Similar to previous.
-
G.11. Viewing the Grade of a Module
-
Viewing the grade of a module while a timetable is selected and the selected timetable’s modules are listed
-
Prerequisites: Select a timetable using the
timetable activecommand. A timetable will be set as the active timetable. Then list modules withmodule list. At least one module should be listed. -
Test case:
module grade MODULE_CODE(whereMODULE_CODEis one of the listed modules).
Expected: Grade of specified module is displayed. Details of the deleted timetable are shown in the status message. Timestamp in the status bar is updated. -
Test case:
module grade
Expected: Module grade is not displayed. Error details are shown in the status message. Status bar remains the same. -
Other incorrect delete commands to try:
module grade text
Expected: Similar to previous.
-
G.12. Viewing the Grades of a Plan
-
Viewing the grades of a plan while the plan is selected
-
Prerequisites: Select a plan using the
student activecommand. A plan will be set as the active plan. -
Test case:
student grade
Expected: Selected student’s grades are listed in the status message.
-
G.13. Viewing the Graduation Requirements of a Plan
-
Viewing the graduation requirements of a plan while the plan is selected
-
Prerequisites: Select a plan using the
student activecommand. A plan will be set as the active plan. -
Test case:
major status
Expected: Selected student’s graduation requirements are listed in the status message.
-
G.14. Setting the Specialisation of a Plan
-
Setting the specialisation of a plan while the plan is selected
-
Prerequisites: Select a plan using the
student activecommand. A plan will be set as the active plan. -
Test case:
specialisation set algo
Expected: Selected student’s specialisation is updated. Details of the new specialisation are shown in the status message. Timestamp in the status bar is updated. -
Test case:
specialisation set abcdefg
Expected: Selected student’s specialisation is not updated. Error details are shown in the status message. Status bar remains the same. -
Other incorrect delete commands to try:
specialisation set
Expected: Similar to previous.
-
G.15. Adding a Lesson
-
Adding a lesson while a active student is selected
-
Prerequisites: Set active student with command
student active. -
Test case:
lessons add m/CS1231 lesson/10 sem/ONE
Expected: Lesson is added to the active student timetable. Details of the added lessons are shown in the status message. Calendar is filled up to show the change. -
Test case:
lessons add text
Expected: No lessons is added. Error details are shown in the status message. Status bar remains the same. Calendar remains the same. -
Other incorrect delete commands to try:
lessons add,
Expected: Similar to previous.
-
G.16. Removing a Lesson
-
Removing a lesson while a active student is selected
-
Prerequisites: Set active student with command
student activeand at least one lesson is added. -
Test case:
lessons remove 1
Expected: Lesson is moved from the active student timetable. Details of the removed lessons are shown in the status message. Calendar is updated to show the change. -
Test case:
lessons remove text
Expected: No lessons is removed. Error details are shown in the status message. Status bar remains the same. Calendar remains the same. -
Other incorrect delete commands to try:
lessons remove,
Expected: Similar to previous.
-
G.17. Listing all Lesson
-
Listing all lessons while a active student is selected
-
Prerequisites: Set active student with command
student active. -
Test case:
lessons list
Expected: Lesson is listed out in the status message. You can also launch calendar to see the bottom scroll pane which will have the same information as well.
-
G.18. Viewing module information
-
Viewing the module information
-
Prerequisites: Module has been successfully loaded.
-
Test case: Click on any module in the module pane. Expected: A new window is opened to show the module information.
-
G.19. Viewing lesson information for a module
-
Viewing the lesson information for a module
-
Prerequisites: A module has been selected.
-
Test case: Click on either of the semesters button on the module description page if applicable. Expected: A new window is opened to show the timetable containing the lesson information.
-
G.20. Saving Data
-
Dealing with missing/corrupted data files
-
Test case: Delete the file named
planner.jsonin thedatafolder, relative to the path of the jar file. Launch the app by double-clicking the jar file.
Expected: Shows the GUI with a set of sample plans. -
Test case: Edit the file named
planner.jsonin thedatafolder such that it is no longer valid JSON. This can be done by deleting the last non-whitespace character in the file, which should be a curly closing bracket.
Expected: Shows the GUI with a set of sample plans.