By: CS2103T-W13-4 Since: Jan 2020 Licence: MIT
Thank you for your interest in the NUS Module Planner and welcome to the User Guide!
- 1. Introduction
- 2. How To Use This User Guide
- 3. Quick Start
- 4. Features
- 4.1. Main Navigation
- 4.2. Student Management
- 4.3. Degree Management
- 4.4. Timetable Management
- 4.5. Calendar Interface
- 4.6. Module Interface and Search
- 4.7. Module Management
- 4.8. Lesson Management
- 4.9. Grade Management
- 4.10. Saving Your Data
- 4.11. Sharing Your Data Files
[coming in v2.0] - 4.12. Proposed Future Enhancements
- 5. FAQ
- 6. Glossary
- 7. Command & Features Summary
1. Introduction
The NUS Module Planner (NUSModPlnr) is for Computer Science (CS) students at the National University of Singapore (NUS) to manage their enrollments in NUS modules over their school life. With NUSModPlnr, module planning has never been easier!
When starting up the application, you will be able to see the Home Screen (Figure 1. below).
Do you want to keep track of the modules you will be taking over multiple semesters? Do you want to easily create multiple plans of these multiple semesters?
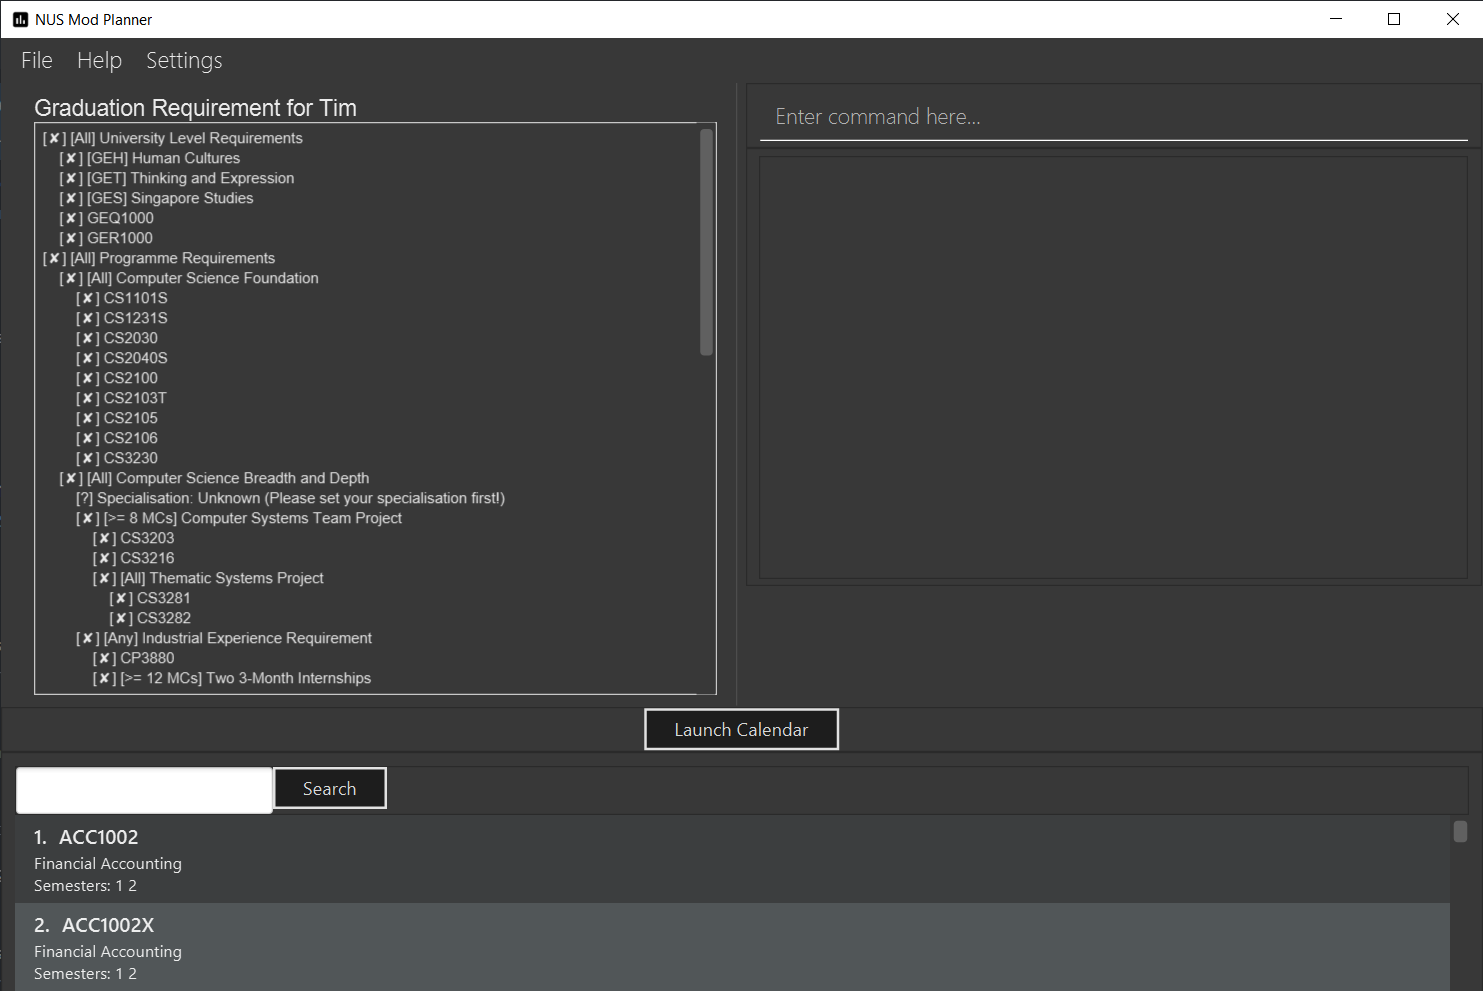
Are you frustrated about managing the numerous details of the graduation requirements for a CS degree? NUSModPlnr allows you to check which graduation requirements you can satisfy, on the fly.
Do you want to keep track of your grades to better decide on which modules to enrol in? NUSModPlnr provides a simple way to calculate grade statistics.
If you can type fast, NUSModPlnr can help you plan your modules in a fast, yet intuitive way. NUSModPlnr is optimized for those who prefer to work with a Command Line Interface (CLI) while still having the benefits of a Graphical User Interface (GUI).
2. How To Use This User Guide
(Danish wrote this section on "How To Use This User Guide" below.)
NUSModPlnr is a timetable and enrollment management application, which help you add plans which consist of your degree programme and timetables for different semesters.
This User Guide is designed to bring you through the following features:
-
Viewing Help
-
Creating a New Student
-
Declaring a Specialisations and Focus Areas
-
Viewing and Adding Modules
-
Viewing, Adding and Selecting Timetables
-
Managing and Viewing Grades
-
Viewing your Graduation Requirements
-
Exiting the Application
Please note the following which may serve as points of interests throughout this User Guide:
-
keyword: This grey highlight indicates commands that you can type with more info in Features. -
Enter : This grey highlight with white outline indicates a keyboard’s key to use.
-
underlined : This underline indicates clickable links referring to other sections of this User Guide. When used in conjunction with a grey highlight (e.g.
student active), this indicates a clickable reference to another command. -
bold : This bold font indicates sections of this User Guide.
| This symbol and corresponding box has information that you may wish to take note of. |
| This symbol and corresponding box has tips from the team, which we think might be useful for you. |
| This symbol and corresponding box has warnings on possibly destructive commands or actions that cannot be undone. |
3. Quick Start
(Danish adapted this section on "Quick Start" below.)
If you are looking to jump right into the application, you can follow the below quick steps to get the application up and running:
-
Ensure you have Java
11or above installed in your Computer. -
Download the latest
nusmodplnr.jarhere. -
Copy the file to the folder you want to use as the home folder for your NUS Module Planner.
-
Double-click the file to start the app. The GUI should appear in a few seconds.
-
Type the command in the command box and press Enter to execute it.
e.g. typinghelpand pressing Enter will open the help window. -
Refer to Section 3, “Features” for details of each command.
| These steps are recommended only if you have experience in setting up the application for first time use, or already have a saved file you would like to continue working with. |
4. Features
(Benjamin wrote the preamble of "Features" below.)
These are the key features that are part of the NUSModPlnr!
| Before you dive into the commands themselves, do familiarise yourself with how the User Guide has been formatted in terms of the commands to key in! |
Command Format
-
Words in
UPPER_CASEare the parameters to be supplied by you (e.g. instudent add n/NAME major/MAJOR,NAMEis a parameter which can be used asstudent add n/John Doe major/CS). -
Items in square brackets are optional (e.g
module grade CS2103T [grade/GRADE]can be used asmodule grade CS2103T grade/A+or asmodule grade CS2103T). -
Items surrounded by
<and>can be used any positive number of times (at least once, e.g.<MODULE_CODE>can be used asCS2040(1 time),CS2040 CS2030 CS2103T(3 times), etc). -
Parameters can be in any order (e.g. if the command specifies
n/NAME major/MAJOR,major/MAJOR n/NAMEis also acceptable).
Common Parameters
These are parameters that are commonly used in commands available in NUSModPlnr.
-
MODULE_CODE- a code for a module in NUS -
INDEX- a index number of an item listed-
Must be a positive integer
-
-
LESSON_NUMBER- a number for the class number for a module -
NAME- a name of a entity-
Must be alphanumeric, spaces are allowed
-
-
SEM- an academic semester-
Must be one of the following:
1,2,st1,st2
-
-
YEAR- a year of study (e.g. Year 1, 2, 3, 4, 5, 6)-
Must be a non-negative integer from
1to6
-
-
GRADEa letter grade for a module-
Must be one of the following:
A+,A,A-,B+,B,B-,C+,C,D+,D,F,CS,CU,W,EXE
-
Let’s begin!
4.1. Main Navigation
The following commands below are part of the application’s Main Navigation.
4.1.1. Viewing help: help
If you get lost or are unsure on what commands to use, while in the application, you can use the help command.
Format: help
4.1.2. Exiting the program: exit
When you are done using the application, you can exit the program with the exit command.
Format: exit
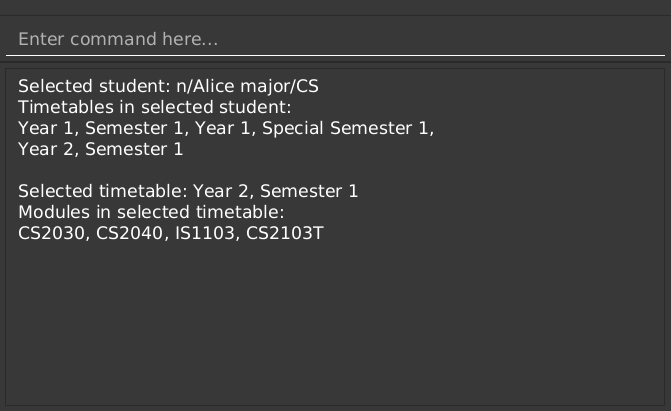
4.1.3. Viewing your selections: status
(Vincent wrote the subsection "Viewing your selections" below)
You can use the status command to view your currently selected students and timetables. (Figure 2. below shows a possible result of the command.)
|
Use the commands in Student Management to create and manage students. |
| Use the commands in Timetable Management and Module Management to manage the timetables and modules that are displayed. |
Format: status
4.1.4. Reset all settings and data: clear
If you would like to start the NUS Module Planner from a clean slate, you can use the clear command.
| This command is irreversible and will erase all existing data! Please back up your data, should ever need to access it again. |
Format: exit
4.2. Student Management
(Vincent wrote the section "Student Management" below)
The following commands below are part of the application’s Student Management, which allow you manage the students which include you for the academic planning. You are highly encouraged to use this Student Management feature to explore different academic plans.
4.2.1. Adding a student: student add
You can use this command to add a student to the student list.
| You may not add multiple students with the same name. |
Format: student add n/NAME major/MAJOR
Example:
-
student add n/Alice major/CS
4.2.2. Removing a student: student remove
You can use this command to remove the student with the number INDEX from the student list.
|
This command cannot be undone. Removing a student will permanently delete its data from the save file. Be sure to remove your intended student by checking the list of students with the student list command.
|
When you use this command on the same student as the student you are currently selecting (see the student active command),
the timetable you have currently selected (see the timetable active command) will be deselected (if a timetable was selected).
|
To work on another student’s timetable, first use the student active command to select a student, then
use the timetable active command to select another timetable.You may see the list of students using the student list command, and
the list of timetables of a selected student has using the timetable list command.
|
Format: student remove INDEX
Example:
-
student remove 1
4.2.3. Selecting a student: student active
You can use this command to select the student with the number INDEX from the student list.
When you use this command, any timetable you have selected (see the timetable active command) will be deselected.
To work on the newly selected student’s timetable, use the timetable active command to select a timetable.You may see the list of timetables the selected student has using the timetable list command.
|
Format: student active INDEX
Example:
-
student active 1
4.2.4. Viewing the student list: student list
You can use this command to display a numbered list of students in the student list (if populated).
Format: student list
Example:
-
student list
4.3. Degree Management
(Danish wrote this section on "Degree Management" below.)
The following commands below are part of the application’s Degree Management, which allow you to declare important details of your academic plan, such as your majors and specialisations.
All the following commands require a student to be selected (using the student active command).
|
4.3.1. Declaring your major: major set
You can use this command to declare the major of your studies, which is also required for the module planning.
Format: major set MAJOR
Examples:
-
major set CS
4.3.2. Declaring your specialisation: specialisation set
You can use this command to declare any specialisations in your studies, should you require them in module planning.
Format: specalisation set [SPEC]
Examples:
-
specialisation set algo
4.3.3. Viewing your degree progression: major status
You can use this command view your degree progression.
Format: major status
Examples:
-
major status
4.4. Timetable Management
(Vincent wrote the section "Timetable Management" below)
The following commands below are part of the application’s Timetable Management, which allow you manage the timetables of your academic plan.
All the following commands require a student to be selected (using the student active command).
|
To see a summary of the student and timetable you have selected, use the status command.
|
4.4.1. Adding a timetable: timetable add
You can use this command to add a timetable to the specified semester of the selected student (see the student active command).
This command requires the YEAR and SEM to conform to the parameter syntax in Common Parameters.The YEAR parameter must be a valid degree year (from 1 to 6, inclusive).The SEM parameter must be one of the following: 1, 2, st1, st2.
|
Format: timetable add year/YEAR sem/SEM
Example:
-
timetable add year/2 sem/1
4.4.2. Removing a timetable: timetable remove
You can use this command to remove a timetable to the specified semester of the selected student (see the student active command).
|
This command cannot be undone. Removing a timetable from the selected student will permanently delete its data from the save file. Be sure to remove your intended timetable by checking the list of timetables with the timetable list command.
|
This command requires the YEAR and SEM to conform to the parameter syntax in Common Parameters.The YEAR parameter must be a valid degree year (from 1 to 6, inclusive).The SEM parameter must be one of the following: 1, 2, st1, st2.
|
Format: timetable remove year/YEAR sem/SEM
Example:
-
timetable remove year/2 sem/1
4.4.3. Selecting a timetable: timetable active
You can use this command to select a timetable of the specified semester of the selected student (see the student active command).
This command requires the YEAR and SEM to conform to the parameter syntax in Common Parameters.The YEAR parameter must be a valid degree year (from 1 to 6, inclusive).The SEM parameter must be one of the following: 1, 2, st1, st2.
|
Format: timetable active year/YEAR sem/SEM
Example:
-
timetable active year/2 sem/1
4.4.4. Viewing the timetable list: timetable list
You can use this command to list all the timetables of the selected student (see the student active command).
Format: timetable list
Example:
-
timetable list
4.5. Calendar Interface
(Hak Wee wrote this section on "Calendar Interface" below.)
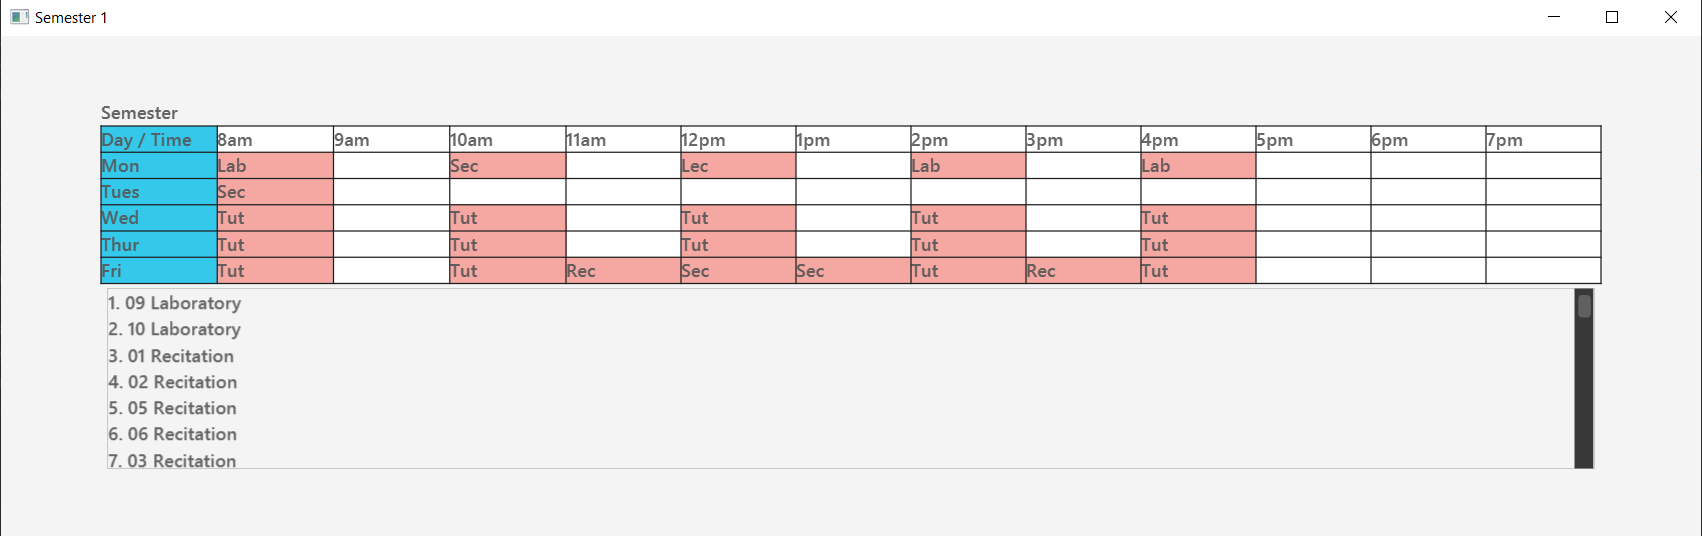
The application has a calendar feature to see the timetable schedule. Once a lesson has been added, it will show up in calendar after pressing the launch calendar button.
You can see the Launch Calendar Button (Figure 3. below).

4.5.1. Viewing the "Calendar Schedule"
There are two ways to view the Calendar. You can click on the launch calendar to see the lessons that you have added. Another way is to click on the semester button in the module description page to see the lessons available.
You can see the Calendar Schedule (Figure 4. below).
4.6. Module Interface and Search
(Hak Wee wrote this section on "Module Interface and Search" below.)
When the application is first launched, you can see all the modules available to you in NUS. You can scroll through all the modules to find the desirable module to take for the semester.
You can see the Module Panel Screen (Figure 5. below).

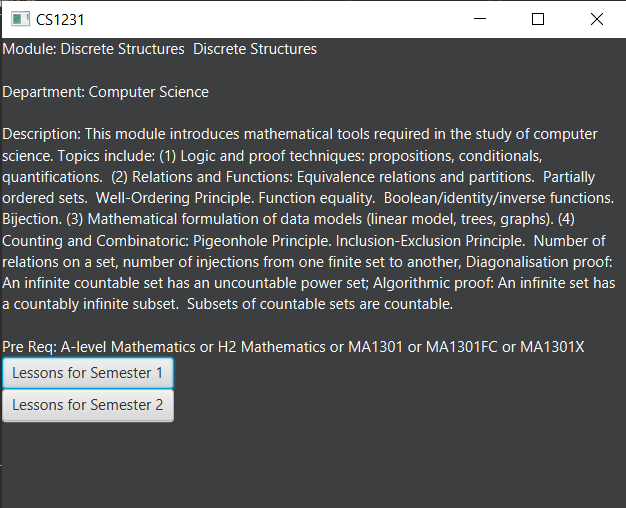
4.6.1. Viewing information on a specific module
You can click on any of the modules to see the module description. It will launch a separate screen to show you the details.
Here is the Module Description Screen (Figure 6. below).
4.6.2. Searching for a specific module
You can use the search bar to search for any module based on their module code or module name. Click on the search button to begin the search.
Here is the Search Screen (Figure 7. below).

4.7. Module Management
(Benjamin wrote this section on "Module Management" below.)
The following commands below are part of the application’s Module Management, which allow you manage the modules of your academic plan.
Do note that you can click on the modules to see the module description. When managing your modules, you will be able to see the Module View Screen (Figure 8. below).

All the following commands require a timetable to be selected (using the timetable active command).
|
4.7.1. Adding modules: module add
You can use this command to add a number of modules to your timetable for the selected semester (see the timetable active command) and student (see the student active command).
Format: module add <MODULE_CODE>
Example:
-
module add CS2040 -
module add CS2040 CS2103T CS2101
4.7.2. Removing modules: module remove
You can use this command to remove a number of modules from your timetable for the selected semester (see the timetable active command) and student (see the student active command).
Format: module remove <MODULE_CODE>
Example:
-
module remove CS2040 -
module remove CS2040 CS2103T CS2101
4.7.3. Viewing added modules: module list
You can use this command to display a list of modules of your timetable for the selected semester (see the timetable active command) and student (see the student active command).
Format: module list
Example:
-
module list
4.7.4. Adding exempted modules: exempt add
You can use this command to add a number of exempted modules for the selected student (see the student active command).
Format: exempt add <MODULE_CODE>
Example:
-
exempt add CS2040 -
exempt add CS2040 CS2103T CS2101
4.7.5. Removing exempted modules: exempt remove
You can use this command to remove a number of exempted modules from the selected student (see the student active command).
Format: exempt remove <MODULE_CODE>
Example:
-
exempt remove CS2040 -
exempt remove CS2040 CS2103T CS2101
4.7.6. Viewing exempted modules: exempt list
You can use this command to display a list of modules that you have declared as exempted.
Format: exempt list
Example:
-
exempt list
4.8. Lesson Management
The following commands below are part of the application’s Lesson Management, which allows you manage the lessons for the academic planning. You are highly encouraged to use this Lesson Management feature to explore different academic plans.
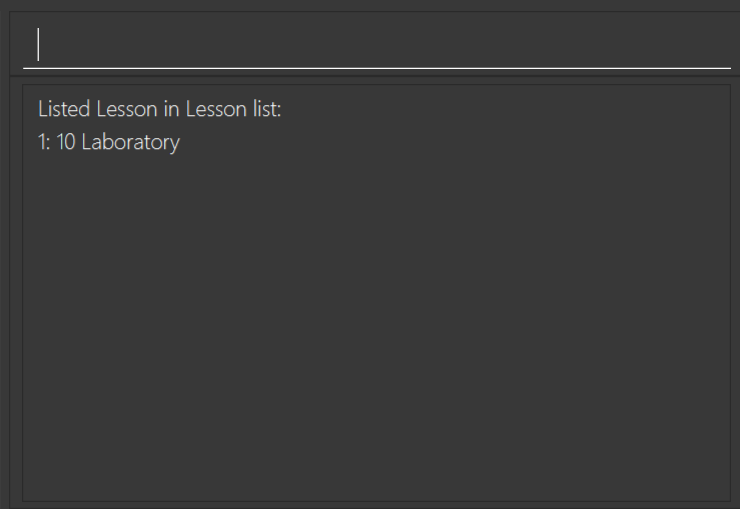
When managing lessons, you will be able to see the Lesson View Screen (Figure 9. below).
4.8.1. Adding a lesson: lessons add
You can use this command to add a lesson to the lesson list. You can see modules on the modules panel screen to see what lessons are available.
| You may not add multiple lesson with the same class number. |
Format: lessons add m/MODULE lesson/LESSON_NUMBER sem/SEM
Example:
-
lessons add m/CS1231 lesson/10 sem/1
4.8.2. Removing a lesson: lessons remove
You can use this command to remove the lesson with the number INDEX from the lesson list.
Format: lesson remove INDEX
Example:
-
lesson remove 1
4.8.3. Viewing the lesson list: lessons list
You can use this command to list all the lesson of the selected student (see the student active command).
Format: lessons list
Example:
-
lessons list
4.9. Grade Management
(Vincent wrote the section "Grade Management" below)
The following commands below are part of the application’s Grade Management, which allow you to manage and view your grades to see modules affected in your academic plan.
|
The same module can be added into multiple timetables of the same student. Therefore, each enrollment (one per semester) of the same module can have a separate grade. For example, it is possible for you to enroll in the module CS2040 during year/1 sem/1 and then year/1 sem/2.You may refer to Timetable Management to see how you can use timetables. |
4.9.1. Managing a module’s grade: module grade
You can use this command to manage the grades of your modules. The following variants of the command can view and set the grade of the module you specify.
This command and its variants require a timetable to be selected (using the timetable active command).
|
4.9.1.1. Viewing a module’s grade
You can use this command to display the grade of the specified module.
|
This command only shows the grade of the specified module in your currently selected timetable. You can use the student grade command to view the grades of all modules together.
|
Format: module grade MODULE_CODE
Example:
-
module grade CS2040
4.9.1.2. Setting a module’s grade
You can use this command to set the grade of the specified module.
The modules which you set the grades of using this command will be counted towards your academic performance (see the student grade command).
| This command only modifies the grade of the module in the selected timetable. Other enrollments with the same module code in different semesters will not be affected. |
Format: module grade MODULE_CODE grade/GRADE
Example:
-
module grade CS2040 grade/A
4.9.1.3. Exercising the Satisfactory/Unsatisfactory option for a module
You can declare that you have chosen to exercise the Satisfactory/Unsatisfactory for a module using the following variant of this command.
The modules which you set the grades of using this command are not counted towards your academic performance (see the student grade command). However, grade you specify will still be recorded.
| This command only modifies the grade of the module in the selected timetable. Other enrollments with the same module code in different semesters will not be affected. |
Format: module grade MODULE_CODE su/GRADE
Example:
-
module grade IS1103 su/F
4.9.2. Viewing a student’s grade: student grade
You can use this command to display the Cumulative Average Point of the selected student (see the student active command).
Other statistics such as the number of modules declared as Satisfactory/Unsatisfactory are also shown.
You may also see a list of modules taken and their grades.
This command requires a student to be selected (using the student active command).
|
Use the module grade command to set the grade of modules in the currently selected timetable of a student.
|
| The same module can be added into multiple timetables of the same student. Refer to Timetable Management to see how you can use timetables. |
| Use this command to be informed of your academic progress and to plan ahead for difficult modules. |
Format: student grade
Example:
-
student grade
4.10. Saving Your Data
(Benjamin adapted this section on "Saving Your Data" below.)
NUS Module Planner data is saved to the hard disk automatically after any command that changes the data.
There is no need to save manually.
4.11. Sharing Your Data Files [coming in v2.0]
Coming soon to you!
4.12. Proposed Future Enhancements
(Benjamin wrote this section on "Proposed Future Enhancements" below.)
NUS Module Planner has a lot more potential to grow!
Below are some of the other great features we think can be implemented in v2.0 onward:
-
Module Viewer with Search - Other than just searching for modules, search for their content instead, such as modules that deal with Heat Transfer or Geology.
-
Timetable Planner with Friends - Instead of just viewing timetables of different students (i.e. friends) separately, be able to overlay them in one "Timetable View", for easier group planning.
-
Requirements Double-Upper - Instead of just one
Major, handle doubleMajorprogramme students, or even those with Minors. -
Module Popularity Prediction - Get and analyse historic data from NUSMods about module uptake, so that students do not have to plan for modules that would be overly subscribed.
-
Support for Overseas Exchange and University Town College Programmes - Be able to plan for special modules only offered in these programmes, if a student is enrolled in them.
-
Live Module Data - Get the latest Module Data available from NUS Mods and plan your Semester before it starts.
-
Module Data History - View historical data on Module enrollments and decide if when you want to take a certain
Module.
5. FAQ
(Hak Wee populated this section on "FAQ" below.)
This provides a list of Frequently Asked Questions (FAQ) that you may have.
5.1. General Questions
Q: Do I need any particular system requirements to run this application?
A: Our application is designed to work on most major operating systems (i.e. Windows, macOS and Linux) and is lightweight, as long as you have Java 11 installed.
Q: How do I transfer my data to another Computer?
A: Install the app in the other computer and overwrite the empty data file it creates with the file that contains the data of your previous NUSModPlnr folder.
5.2. Feature Specific Questions
Q: Who can I add as students?
A: You can add yourself to track your degree progression, or add your friends as well, if you would like to sync your academic plan together.
Q: Why are there letters beside the lesson number in the calendar?
A: NUS assigns letter codes to each lesson type for their internal management. Nonetheless, you only need to type the lesson number when managing your lessons.
Q: Why are the lessons not shifted for each respective timetable?
A: Lessons are tagged to the Active Student, to allow you to see historical data on all lessons you have taken in previous semesters.
| If you have questions, feel free to open an issue in our Issue Tracker on GitHub! |
6. Glossary
This Glossary provides explanations for keywords used throughout the User Guide.
7. Command & Features Summary
This section provides a quick summary on all the commands currently available in the application.
| If you need more in-depth information on a specific command, you can CTRL+F the exact command name to find it in the Features section. |
7.1. Main Navigation
-
Viewing help :
help -
Exiting the program :
exit -
Viewing your selections:
status -
Resetting all settings and data:
clear
7.2. Student Management
-
Adding a student :
student add -
Removing a student :
student remove -
Selecting a student :
student active -
Viewing the student list :
student list
7.3. Degree Management
-
Declaring your major :
major set -
Declaring your specialisation:
specialisation set -
Viewing your degree progression :
major status
7.4. Timetable Management
-
Adding a timetable :
timetable add -
Removing a timetable :
timetable remove -
Selecting a timetable :
timetable active -
Viewing the timetable list :
timetable list
7.6. Module Interface and Search
Features in this category are GUI-based.
-
Viewing information on a specific module
-
Searching for a specific module
7.7. Module Management
-
Adding modules :
module add -
Removing modules :
module remove -
Viewing added modules :
module list -
Adding exempted modules :
exempt add -
Removing exempted modules :
exempt remove -
Viewing exempted modules :
exempt list
7.8. Lesson Management
-
Adding a lesson:
lessons add -
Removing a lesson:
lessons remove -
Viewing the lesson list:
lessons list
7.9. Grade Management
-
Managing a module’s grade :
module grade -
Viewing a student’s grade :
student grade