Overview
The NUS Module Planner (NUSModPlnr) is for Computer Science (CS) students at the National University of Singapore (NUS) to manage their enrollments in NUS modules over their school life. With NUSModPlnr, module planning has never been easier!
The user interacts with it using a CLI, and it has a GUI created with JavaFX. It is written in Java, and has about 250+ kLoC.
Summary of contributions
-
Major feature: Importing of all lessons for each module offered by NUS, made available using the NUSMods.
-
What it does: Allows the user to view the list of all the lessons offered by NUS for a given modules, including details such as class number, start time, end time, venue.
-
Justification: This feature improves the product significantly because a user can view actual accurate data of the lessons currently being offered by NUS for a given module, with the latest data available.
-
Highlights: This feature allows the calendar portion of the application to be filled up. As real life data was provided by NUSMods, there was no need to populate with fake data.
-
Credits: NUSMods for providing the data and API.
-
-
Major feature: Revamped the entire UI of the application.
-
What it does: Allows the user to use the application with an interface instead of a command line.
-
Justification: This feature allows the application to be more user friendly and also show information that would be deem hard to read through a command line.
-
Highlights: The calendar was build from scratch using grid panes and anchor panes.
-
Credits: SceneBuilder.
-
-
Minor enhancement: Added in panel to show Graduation Requirements by using the graduation requirements developed by @DANamic and @Capeguy.
-
Minor enhancement: Modified the module panel to display the modules as well as their information when clicked. It also provides the lesson details based on the calendar feature.
-
Code contributed: Please see the RepoSense Report here!
-
Other contributions:
-
Project contributions:
-
Contributed to releases
v1.0-v1.4(5 releases) on GitHub
-
-
Documentation:
-
Generated diagrams to enhance readability of Developer Guide
-
Contributed to Features and Module Management sections of User Guide
-
-
Community:
-
Contributions to the User Guide
Given below are sections I contributed to the User Guide. They showcase my ability to write documentation targeting end-users. |
Calendar Interface
(Hak Wee wrote this section on "Calendar Interface" below.)
The application has a calendar feature to see the timetable schedule. Once a lesson has been added, it will show up in calendar after pressing the launch calendar button.
You can see the Launch Calendar Button (Figure 3. below).

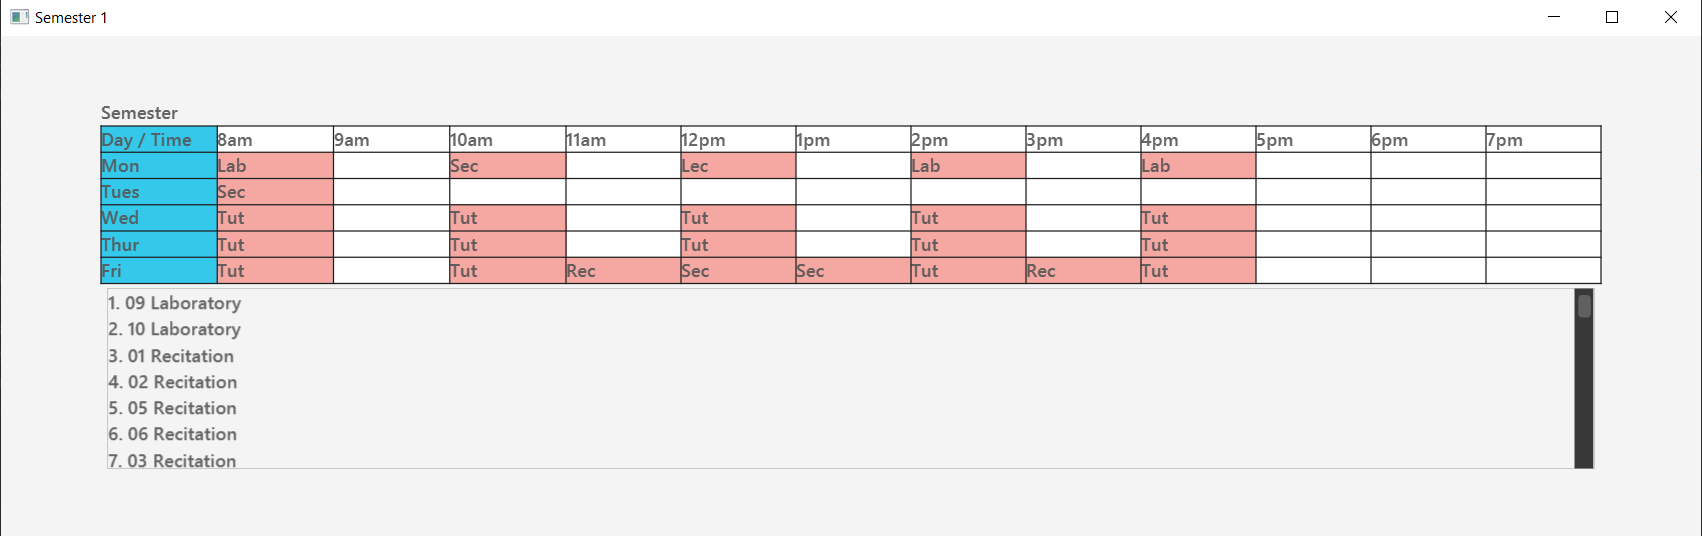
Viewing the "Calendar Schedule"
There are two ways to view the Calendar. You can click on the launch calendar to see the lessons that you have added. Another way is to click on the semester button in the module description page to see the lessons available.
You can see the Calendar Schedule (Figure 4. below).
Module Interface and Search
(Hak Wee wrote this section on "Module Interface and Search" below.)
When the application is first launched, you can see all the modules available to you in NUS. You can scroll through all the modules to find the desirable module to take for the semester.
You can see the Module Panel Screen (Figure 5. below).

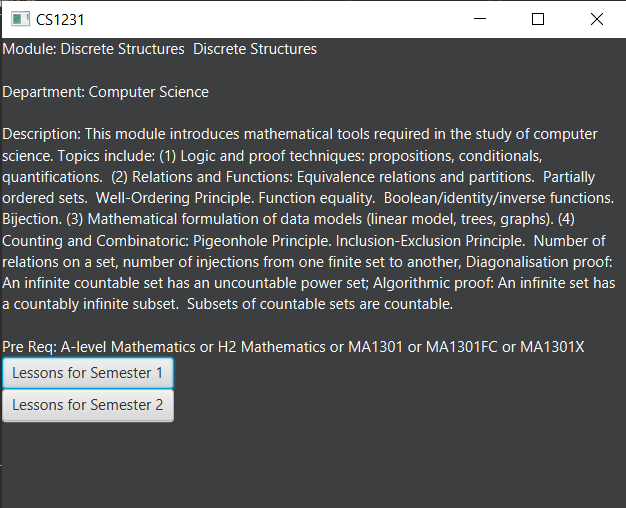
Viewing information on a specific module
You can click on any of the modules to see the module description. It will launch a separate screen to show you the details.
Here is the Module Description Screen (Figure 6. below).
Searching for a specific module
You can use the search bar to search for any module based on their module code or module name. Click on the search button to begin the search.
Here is the Search Screen (Figure 7. below).

Proposed Future Enhancements
(Benjamin wrote this section on "Proposed Future Enhancements" below.)
NUS Module Planner has a lot more potential to grow!
Below are some of the other great features we think can be implemented in v2.0 onward:
-
Module Viewer with Search - Other than just searching for modules, search for their content instead, such as modules that deal with Heat Transfer or Geology.
-
Timetable Planner with Friends - Instead of just viewing timetables of different students (i.e. friends) separately, be able to overlay them in one "Timetable View", for easier group planning.
-
Requirements Double-Upper - Instead of just one
Major, handle doubleMajorprogramme students, or even those with Minors. -
Module Popularity Prediction - Get and analyse historic data from NUSMods about module uptake, so that students do not have to plan for modules that would be overly subscribed.
-
Support for Overseas Exchange and University Town College Programmes - Be able to plan for special modules only offered in these programmes, if a student is enrolled in them.
-
Live Module Data - Get the latest Module Data available from NUS Mods and plan your Semester before it starts.
-
Module Data History - View historical data on Module enrollments and decide if when you want to take a certain
Module.
FAQ
(Hak Wee populated this section on "FAQ" below.)
This provides a list of Frequently Asked Questions (FAQ) that you may have.
General Questions
Q: Do I need any particular system requirements to run this application?
A: Our application is designed to work on most major operating systems (i.e. Windows, macOS and Linux) and is lightweight, as long as you have Java 11 installed.
Q: How do I transfer my data to another Computer?
A: Install the app in the other computer and overwrite the empty data file it creates with the file that contains the data of your previous NUSModPlnr folder.
Feature Specific Questions
Q: Who can I add as students?
A: You can add yourself to track your degree progression, or add your friends as well, if you would like to sync your academic plan together.
Q: Why are there letters beside the lesson number in the calendar?
A: NUS assigns letter codes to each lesson type for their internal management. Nonetheless, you only need to type the lesson number when managing your lessons.
Q: Why are the lessons not shifted for each respective timetable?
A: Lessons are tagged to the Active Student, to allow you to see historical data on all lessons you have taken in previous semesters.
| If you have questions, feel free to open an issue in our Issue Tracker on GitHub! |
Contributions to the Developer Guide
Given below are sections I contributed to the Developer Guide. They showcase my ability to write technical documentation and the technical depth of my contributions to the project. |
UI Component

API : Ui.java
The UI consists of a MainWindow that is made up of parts e.g. CalendarBox, CommandBox, GradWindow, ModuleCard, ModuleListPanel, ResultDisplay, StatusBarFooter etc. All these, including the MainWindow, inherit from the abstract UiPart class.
The UI component uses JavaFx UI framework. The layout of these UI parts are defined in matching .fxml files that are in the src/main/resources/view folder. For example, the layout of the MainWindow is specified in MainWindow.fxml
The UI component,
-
Executes user commands using the
Logiccomponent. -
Listens for changes to
Modeldata so that the UI can be updated with the modified data.
Calendar View
The application has a "Calendar Schedule" window implemented to allow students to see their timetable and lesson schedules. Once a lesson has been added, will they be visible in this window upon launch by the Launch Calendar button.
Calendar UI Implementation
There are two ways to view the Calendar. You can click on the launch calendar to see the lessons that you have added. Another way is to click on the semester button in the module description page to see the lessons available.
The Calendar builds its UI based on this implemented components:
-
Show Calendar
setCalendar(List<Lesson> lessons)
We will add more about how we implemented this further, and the design decisions made.
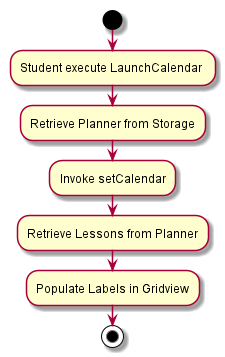
The Calendar populates each of the Label in the grid pane based on the list of Lesson provided by the planner.
Design Considerations
-
Alternative 1 (Current implementation): To build the table using scene builder with each labels being shaded to show the time
-
Pros: Every single UI component of the calendar is customizable, allowing for further modifications.
-
Cons: Tedious and duplicated code for each Label to be set a value.
-
-
Alternative 2: Use another library jfxtras which has an i calendar API
-
Pros: Reduce the amount of work needed to create the component
-
Cons: Comes with bugs that scene builder is unable to support
-
Lesson Features
The Lesson Feature allows students to manage the their respective lessons for the academic planning. When managing lessons, they are rendered in a Lesson View Screen in the GUI.
Lesson Implementation
The Lesson entities are automatically created and populated through the JSON data received from NUSMods. Furthermore, Lesson entities are coupled to Module entities in a *..1 relationship.
This coupling allows us to detect if a student tries to add duplicate Lesson entities and perform error handling or alternative advisement, where possible.
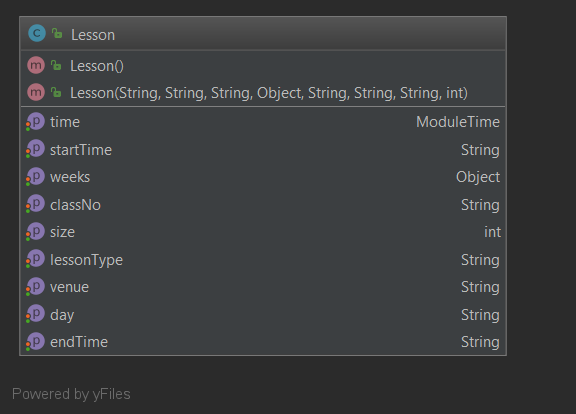
Lesson ImplementationThe attributes of the Lesson class are retrieved from the serialised JSON file.
This implementation consist of 3 commands.
-
LessonAdd- Finds the lessons from the module and add it into the list of lessons for the active student. -
LessonList- List down the lessons for the active student. -
LessonRemove- Remove the lessons from the active student based on the provided index.
Adding of Lesson
The LessonAddCommandParser method is called and it will get the ModuleCode and Semester provided by the arguments. It will run the LessonDataImporterUtil class run method to convert the json file to Lesson Object. This is then added to the active student on the planner.
Listing of Lesson
The LessonListCommand method is called and it will iterate through the list of Lesson that is associated with the active student in the planner.
Deleting of Lesson
The LessonRemoveCommandParser method is called and it will get the Index provided by the arguments. It will retrieve the list of Lesson and delete the object based on the index given.
Design Considerations
-
Alternative 1 (Current Implementation): Letting the users decide the lesson they want.
-
Pros: Allows for flexibility as it can reuse some of the code written for modules to adapt for lessons.
-
Cons: More checks are needed to ensure user do not key in invalid values
-
-
Alternative 2: Hard code to take the first option of each lesson.
-
Pros: Easier logic for the developer. Less bugs to deal with.
-
Cons: Inconvenient for the user and does not allow the flexibility to choose the lesson that they want to take.
-
Module Search
On First Launch, all the modules that are available in NUS (in accordance to NUSMods data) is populated into the Module Panel Screen. This allows a student to select modules and view the corresponding module descriptions and details.
Students are able utilise the "Search Bar" to search for any module based on the module code or module name. When given the query with the corresponding values, the following logic takes place:
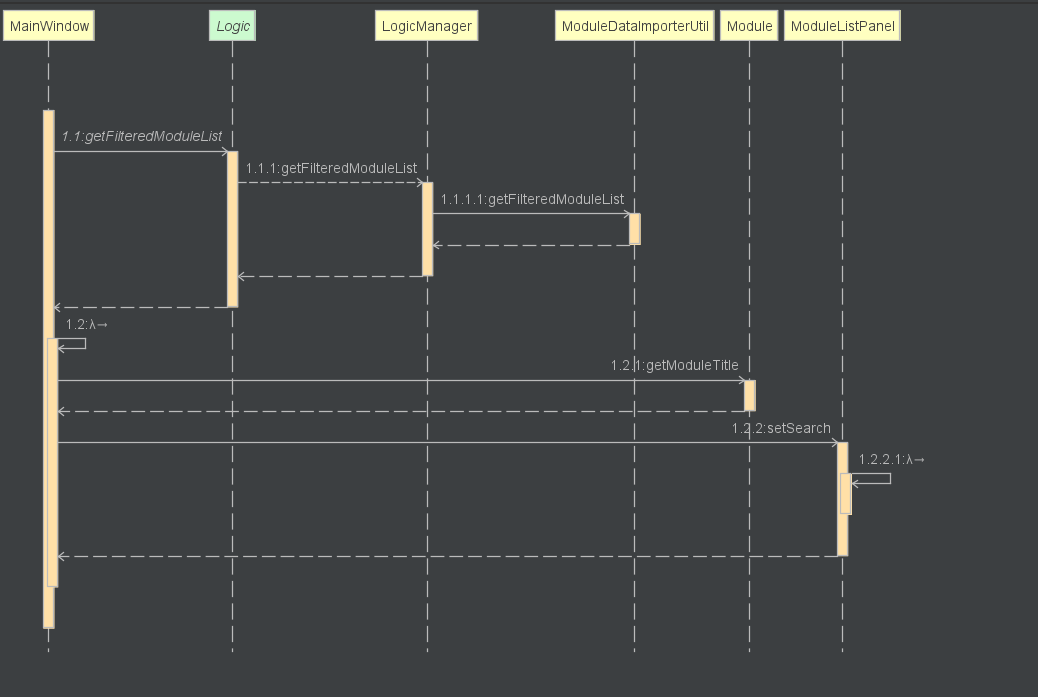
If any results match the query enetered, they are populated into the Search Screen GUI for the user.
Design Considerations
-
Alternative 1 (Current Implementation): Using streams to collect the modules and search
-
Pros: Less mutability as the modules will not be accidentally modified.
-
Cons: Hard to debug when there is a bug.
-
-
Alternative 2: Loop and search each modules.
-
Pros: Lightweight using a for loop.
-
Cons: Modules may be accidentally modified if it is not protected properly.
-
These parts below are in collaboration with the team. @Capeguy, @DANamic and @thetruevincentchow
Appendix A: Use Cases
For all use cases below, the System is the Planner and the Actor is the user, unless specified otherwise.
| The following Use Case guidelines do not take into account Edge Cases, which we acknowledge are not handled. Instead, please keep a look out for the pre-definied scopes as stated in each Unit Test Case below. |
Use Case: Add Plan (UCA01)
MSS
-
User requests to add a plan
-
User supplies plan name and plan major
-
Planner adds the plan
Use case ends.
Extensions
-
2a. Any of the plan or major is missing or invalid
-
2a1. Planner shows an error message
Use case ends.
-
Use Case: Delete Plan (UCA02)
MSS
-
User requests to list plans
-
Planner shows a list of plans
-
User requests to delete a specific plan in the list
-
Planner deletes the plan
Use case ends.
Extensions
-
2a. The list is empty
Use case ends.
-
3a. The given index is invalid
-
3a1. Planner shows an error message
Use case resumes at step 2.
-
Use Case: Select Plan (UCA03)
MSS
-
User requests to list plans
-
Planner shows a list of plans
-
User requests to select a specific plan in the list
-
Planner selects the plan as the active plan
Use case ends.
Extensions
-
2a. The list is empty
Use case ends
-
3a. The given index is invalid
-
3a1. Planner shows an error message
Use case resumes at step 2.
-
Use Case: Add Timetable (UCB01)
MSS
-
User selects a plan (UCA03)
-
User requests to add a timetable
-
User specifies semester of the timetable
-
Planner adds the timetable to the active plan
Use case ends.
Extensions
-
2a. There is no plan currently selected
-
2a1. Planner shows an error message
Use case ends.
-
-
3a. The given semester is invalid
-
3a1. Planner shows an error message
Use case ends.
-
Use Case: Delete Timetable (UCB02)
MSS
-
User selects a plan (UCA03)
-
User requests to list timetables
-
Planner shows a list of timetables of the active plan
-
User specifies a corresponding semester for a timetable to delete
-
Planner deletes the timetable from the active plan
Use case ends.
Extensions
-
2a. There is no plan currently selected
-
2a1. Planner shows an error message
Use case ends.
-
-
4a. The given semester is invalid
-
4a1. Planner shows an error message
Use case resumes at step 3.
-
Use Case: Select Timetable (UCB03)
MSS
-
User selects a plan (UCA03)
-
User requests to list timetables
-
Planner shows a list of timetables of the active plan
-
User requests to select a specific timetable in the list
-
Planner selects the timetable as the active timetable
Use case ends.
Extensions
-
2a. The list is empty
Use case ends.
-
4a. The given semester is invalid
-
4a1. Planner shows an error message
Use case resumes at step 3.
-
Use Case: Add Module (UCC01)
MSS
-
User selects a timetable (UCB03)
-
User requests to add a specified module
-
Planner adds the module to the active timetable
Use case ends.
Extensions
-
2a. The given module is invalid
-
2a1. Planner shows an error message
Use case ends.
-
-
2b. The given module already exists in the timetable
-
2b1. Planner shows an error message
Use case ends.
-
Use Case: Delete Module (UCC02)
MSS
-
User selects a timetable (UCB03)
-
User requests to delete a specified module
-
Planner deletes the module from the active timetable
Use case ends.
Extensions
-
2a. The given module is invalid
-
2a1. Planner shows an error message
Use case ends.
-
-
2b. The given module does not exist in the timetable
-
2b1. Planner shows an error message
Use case ends.
-
Use Case: List Grades (UCD01)
MSS
-
User selects a plan (UCA03)
-
User requests to list grades
-
Planner lists the total number of grades, and cumulative statistics
Use case ends.
Extensions
-
2a. The user requests to list all modules taken instead
-
2a1. Planner lists all modules taken with their respective grades instead
Use case ends.
-
Use Case: Set Module Grade (UCD02)
MSS
-
User selects a timetable (UCB03)
-
User requests to set the grade of a specified module
-
Planner sets the grade of the specified module
Use case ends.
Extensions
-
2a. The given module is invalid
-
2a1. Planner shows an error message
Use case ends.
-
-
2b. The given module does not exist in the timetable
-
2b1. Planner shows an error message
Use case ends.
-
-
2c. The given grade is invalid
-
2c1. Planner shows an error message
Use case ends.
-
Use Case: Add Lesson (UCE01)
MSS
-
User selects a timetable (UCB03)
-
User requests to add a specific lesson for a module
-
Planner adds the lesson to the active timetable
Use case ends.
Extensions
-
2a. The given module is invalid
-
2a1. Planner shows an error message
Use case ends.
-
-
2b. The given lesson number is invalid
-
2b1. Planner shows an error message
Use case ends.
-
-
2c. The given semester is invalid
-
2c1. Planner shows an error message
Use case ends.
-
Use Case: Delete Lesson (UCE02)
MSS
-
User selects a timetable (UCB03)
-
User requests to delete a specified lesson
-
Planner deletes the lesson from the active timetable
Use case ends.
Extensions
-
2a. The given index is invalid
-
2a1. Planner shows an error message
Use case ends.
-
Appendix B: Instructions for Manual Testing
Given below are instructions to test the app manually.
These instructions only provide a starting point for testers to work on; testers are expected to do more exploratory testing.
| The following Manual Testing guidelines do not take into account Edge Cases, which we acknowledge are not handled. Instead, please keep a look out for the pre-definied scopes as stated in each Test Case below. |
Launch and Shutdown
-
Initial launch
-
Download the jar file and copy into an empty folder
-
Double-click the jar file
Expected: Shows the GUI with a set of sample plans. The window size may not be optimal.
-
-
Saving window preferences
-
Resize the window to an optimum size. Move the window to a different location. Close the window.
-
Re-launch the app by double-clicking the jar file.
Expected: The most recent window size and location is retained.
-
Adding a Plan
-
Adding a plan while all plans are listed
-
Prerequisites: List all plans using the
student listcommand. All plans will be displayed the list. -
Test case:
student add n/Alice major/CS
Expected: Plan is added to the list. Details of the deleted plan are shown in the status message. Timestamp in the status bar is updated. -
Test case:
student add major/CS
Expected: No plan is added. Error details are shown in the status message. Status bar remains the same. -
Other incorrect delete commands to try:
student add,student add n/
Expected: Similar to previous.
-
Deleting a Plan
-
Deleting a plan while all plans are listed
-
Prerequisites: List all plans using the
student listcommand. All plans will be displayed the list. At least one plan should be listed. -
Test case:
student remove 1
Expected: First plan is deleted from the list. Details of the deleted plan are shown in the status message. Timestamp in the status bar is updated. -
Test case:
student remove 0
Expected: No plan is deleted. Error details are shown in the status message. Status bar remains the same. -
Other incorrect delete commands to try:
student remove,student remove x(where x is larger than the list size),student remove text(wheretextis not a whole number)
Expected: Similar to previous.
-
Selecting a Plan
-
Selecting a plan while all plans are listed
-
Prerequisites: List all plans using the
student listcommand. All plans will be displayed the list. At least one plan should be listed. -
Test case:
student active 1
Expected: Plan is selected as the active plan. Details of the selected plan are shown in the status message. Timestamp in the status bar is updated. -
Test case:
student active 0
Expected: No plan is selected. Error details are shown in the status message. Status bar remains the same. -
Other incorrect delete commands to try:
student active,student active xyz
Expected: Similar to previous.
-
Adding a Timetable
-
Adding a timetable while a plan is selected and the selected plan’s timetables are listed
-
Prerequisites: Select a plan using the
student activecommand. A plan will be set as the active plan. Plan should be empty. -
Test case:
timetable add year/1 sem/1
Expected: Timetable is added to the plan. Details of the added timetable are shown in the status message. Timestamp in the status bar is updated. -
Test case:
timetable add year/1 sem/3
Expected: No timetable is added. Error details are shown in the status message. Status bar remains the same. -
Other incorrect delete commands to try:
timetable add,timetable add year/
Expected: Similar to previous.
-
-
Adding a timetable while a plan is selected with an existing timetable of the same semester
-
Prerequisites: Select a plan using the
student activecommand. Add a timetable using thetimetable add year/1 sem/1command -
Test case:
timetable add year/1 sem/1
Expected: No timetable is added. Error details are shown in the status message. Status bar remains the same.
-
Deleting a Timetable
-
Deleting a timetable while a plan is selected and the selected plan’s timetables are listed
-
Prerequisites: Select a plan using the
student activecommand. A plan will be set as the active plan. Then list timetables withtimetable list. At least one timetable should be listed. -
Test case:
timetable remove year/YEAR sem/SEM(whereYEARandSEMare the year and semester of one of the listed timetables, respectively).
Expected: Specified timetable is deleted from the list. Details of the deleted plan are shown in the status message. Timestamp in the status bar is updated. -
Test case:
timetable remove
Expected: No timetable is deleted. Error details are shown in the status message. Status bar remains the same. -
Other incorrect delete commands to try:
timetable remove year sem,timetable remove year/x(where x is larger than the list size),timetable remove text
Expected: Similar to previous.
-
Selecting a Timetable
-
Selecting a timetable while a plan is selected and the selected plan’s timetables are listed
-
Prerequisites: Select a plan using the
student activecommand. A plan will be set as the active plan. Then list timetables withtimetable list. At least one timetable should be listed. -
Test case:
timetable active year/YEAR sem/SEM(whereYEARandSEMare the year and semester of one of the listed timetables, respectively).
Expected: Specified timetable is deleted from the list. Details of the deleted plan are shown in the status message. Timestamp in the status bar is updated. -
Test case:
timetable active
Expected: No timetable is selected. Error details are shown in the status message. Status bar remains the same. -
Other incorrect delete commands to try:
timetable active year sem,timetable active year/x(where x is larger than the list size),timetable active text
Expected: Similar to previous.
-
Adding a Module
-
Adding a module while a timetable is selected and the selected timetable’s modules are listed
-
Prerequisites: Select a timetable using the
timetable activecommand. A timetable will be set as the active timetable. -
Test case:
module add CS2040
Expected: Module is added to the timetable. Details of the added module are shown in the status message. Timestamp in the status bar is updated. -
Test case:
module add text
Expected: No module is added. Error details are shown in the status message. Status bar remains the same. -
Other incorrect delete commands to try:
module add,
Expected: Similar to previous.
-
-
Adding a module while a timetable is selected with the same module existing in the same timetable
-
Prerequisites: Select a timetable using the
timetable activecommand. Add a module using themodule add CS2040command -
Test case:
module add CS2040
Expected: No module is added. Error details are shown in the status message. Status bar remains the same.
-
Deleting a Module
-
Deleting a module while a timetable is selected and the selected timetable’s modules are listed
-
Prerequisites: Select a timetable using the
timetable activecommand. A timetable will be set as the active timetable. Then list modules withmodule list. At least one module should be listed. -
Test case:
module remove MODULE_CODE(whereMODULE_CODEis one of the listed modules).
Expected: Specified module is deleted from the list. Details of the deleted timetable are shown in the status message. Timestamp in the status bar is updated. -
Test case:
module remove
Expected: No module is deleted. Error details are shown in the status message. Status bar remains the same. -
Other incorrect delete commands to try:
module remove text
Expected: Similar to previous.
-
Setting the Grade of a Module
-
Setting the grade of a module while a timetable is selected and the selected timetable’s modules are listed
-
Prerequisites: Select a timetable using the
timetable activecommand. A timetable will be set as the active timetable. Then list modules withmodule list. At least one module should be listed. -
Test case:
module grade MODULE_CODE grade/A(whereMODULE_CODEis one of the listed modules).
Expected: Grade of specified module is updated. Details of the deleted timetable are shown in the status message. Timestamp in the status bar is updated. -
Test case:
module grade
Expected: Module grade is not updated. Error details are shown in the status message. Status bar remains the same. -
Other incorrect delete commands to try:
module grade text
Expected: Similar to previous.
-
Viewing the Grade of a Module
-
Viewing the grade of a module while a timetable is selected and the selected timetable’s modules are listed
-
Prerequisites: Select a timetable using the
timetable activecommand. A timetable will be set as the active timetable. Then list modules withmodule list. At least one module should be listed. -
Test case:
module grade MODULE_CODE(whereMODULE_CODEis one of the listed modules).
Expected: Grade of specified module is displayed. Details of the deleted timetable are shown in the status message. Timestamp in the status bar is updated. -
Test case:
module grade
Expected: Module grade is not displayed. Error details are shown in the status message. Status bar remains the same. -
Other incorrect delete commands to try:
module grade text
Expected: Similar to previous.
-
Viewing the Grades of a Plan
-
Viewing the grades of a plan while the plan is selected
-
Prerequisites: Select a plan using the
student activecommand. A plan will be set as the active plan. -
Test case:
student grade
Expected: Selected student’s grades are listed in the status message.
-
Viewing the Graduation Requirements of a Plan
-
Viewing the graduation requirements of a plan while the plan is selected
-
Prerequisites: Select a plan using the
student activecommand. A plan will be set as the active plan. -
Test case:
major status
Expected: Selected student’s graduation requirements are listed in the status message.
-
Setting the Specialisation of a Plan
-
Setting the specialisation of a plan while the plan is selected
-
Prerequisites: Select a plan using the
student activecommand. A plan will be set as the active plan. -
Test case:
specialisation set algo
Expected: Selected student’s specialisation is updated. Details of the new specialisation are shown in the status message. Timestamp in the status bar is updated. -
Test case:
specialisation set abcdefg
Expected: Selected student’s specialisation is not updated. Error details are shown in the status message. Status bar remains the same. -
Other incorrect delete commands to try:
specialisation set
Expected: Similar to previous.
-
Adding a Lesson
-
Adding a lesson while a active student is selected
-
Prerequisites: Set active student with command
student active. -
Test case:
lessons add m/CS1231 lesson/10 sem/ONE
Expected: Lesson is added to the active student timetable. Details of the added lessons are shown in the status message. Calendar is filled up to show the change. -
Test case:
lessons add text
Expected: No lessons is added. Error details are shown in the status message. Status bar remains the same. Calendar remains the same. -
Other incorrect delete commands to try:
lessons add,
Expected: Similar to previous.
-
Removing a Lesson
-
Removing a lesson while a active student is selected
-
Prerequisites: Set active student with command
student activeand at least one lesson is added. -
Test case:
lessons remove 1
Expected: Lesson is moved from the active student timetable. Details of the removed lessons are shown in the status message. Calendar is updated to show the change. -
Test case:
lessons remove text
Expected: No lessons is removed. Error details are shown in the status message. Status bar remains the same. Calendar remains the same. -
Other incorrect delete commands to try:
lessons remove,
Expected: Similar to previous.
-
Listing all Lesson
-
Listing all lessons while a active student is selected
-
Prerequisites: Set active student with command
student active. -
Test case:
lessons list
Expected: Lesson is listed out in the status message. You can also launch calendar to see the bottom scroll pane which will have the same information as well.
-
Viewing module information
-
Viewing the module information
-
Prerequisites: Module has been successfully loaded.
-
Test case: Click on any module in the module pane. Expected: A new window is opened to show the module information.
-
Viewing lesson information for a module
-
Viewing the lesson information for a module
-
Prerequisites: A module has been selected.
-
Test case: Click on either of the semesters button on the module description page if applicable. Expected: A new window is opened to show the timetable containing the lesson information.
-
Saving Data
-
Dealing with missing/corrupted data files
-
Test case: Delete the file named
planner.jsonin thedatafolder, relative to the path of the jar file. Launch the app by double-clicking the jar file.
Expected: Shows the GUI with a set of sample plans. -
Test case: Edit the file named
planner.jsonin thedatafolder such that it is no longer valid JSON. This can be done by deleting the last non-whitespace character in the file, which should be a curly closing bracket.
Expected: Shows the GUI with a set of sample plans.