Overview
NUS Module Planner (NUSModPlnr) is for Computer Science (CS) students at the National University of Singapore (NUS) to manage their enrollments in NUS modules over their school life. With NUSModPlnr, module planning has never been easier!
Users can interact with it using a CLI, and it has a GUI created with JavaFX. NUSModPlnr is based on the AddressBook-Level3 application by SE-EDU, and currently has about 15+ KLoC.
Summary of contributions
-
Major enhancement: Added commands to manage students, timetables and modules and grades
-
What it does: Allow the user to create, remove, select and list students, and timetables and modules taken by each student.
-
Justification: This feature is critical for the product since the user cannot plan their academic study without having the ability to add timetables, modules and grades. Having student profiles also allows users to explore different academic plans.
-
Highlights: This enhancement affects all other features and commands. It required an in-depth analysis of design alternatives. The implementation was challenging as it required an extension of commands into sub-commands, and manipulation of deeply nested structures. Significant effort has been used to test the correctness of the main commands.
-
Credits: Logic and Command code used in AddressBook Level 3
-
-
Major enhancement: Designed and created Model and JSON serialisation of many classes involved in the product
-
What it does: Stores, loads and saves the Module Planner’s state in memory and to file.
-
Justification: This feature is needed to enable commands and other features to modify data and work correctly.
-
Highlights: This enhancement supported development of other features of the product. Other developers have used the Model API to implement other functionality. Great care had to be taken to ensure storage and serialisation worked consistently for all conditions.
-
Credits: Storage code used in AddressBook Level 3
-
-
Minor enhancement: Added a
statuscommand to display the currently selected student and timetable. -
Code contributed: Please see the RepoSense Report here!
-
Other contributions:
-
Project management::
-
Managed release v1.2 (1 release) on GitHub
-
-
Community::
-
Enhancements to Existing Features:
-
Wrote tests to increase code coverage from 24.5% to 36.1% (#199)
-
-
Contributions to the User Guide [IN DRAFT]
Viewing your selections: status
(Vincent wrote the subsection "Viewing your selections" below)
You can use the status command to view your currently selected students and timetables. The figure below shows a possible result of the command.
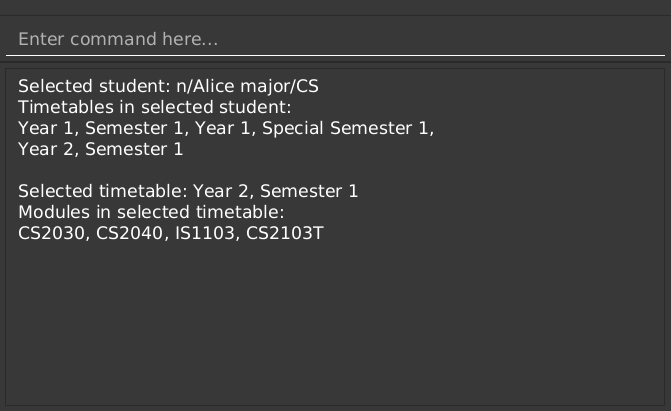
|
Use the commands in Student Management to create and manage students. |
| Use the commands in Timetable Management and Module Management to manage the timetables and modules that are displayed. |
Format: status
Student Management
(Vincent wrote the section "Student Management" below)
The following commands below are part of the application’s Student Management, which allow you manage the students which include you for the academic planning. You are highly encouraged to use this Student Management feature to explore different academic plans.
Adding a student: student add
You can use this command to add a student to the student list.
| You may not add multiple students with the same name. |
Format: student add n/NAME major/MAJOR
Example:
-
student add n/Alice major/CS
Removing a student: student remove
You can use this command to remove the student with the number INDEX from the student list.
|
This command cannot be undone. Removing a student will permanently delete its data from the save file. Be sure to remove your intended student by checking the list of students with the student list command.
|
When you use this command on the same student as the student you are currently selecting (see the student active command),
the timetable you have currently selected (see the timetable active command) will be deselected (if a timetable was selected).
|
To work on another student’s timetable, first use the student active command to select a student, then
use the timetable active command to select another timetable.You may see the list of students using the student list command, and
the list of timetables of a selected student has using the timetable list command.
|
Format: student remove INDEX
Example:
-
student remove 1
Selecting a student: student active
You can use this command to select the student with the number INDEX from the student list.
When you use this command, any timetable you have selected (see the timetable active command) will be deselected.
To work on the newly selected student’s timetable, use the timetable active command to select a timetable.You may see the list of timetables the selected student has using the timetable list command.
|
Format: student active INDEX
Example:
-
student active 1
Viewing the student list: student list
You can use this command to display a numbered list of students in the student list (if populated).
Format: student list
Example:
-
student list
Timetable Management
(Vincent wrote the section "Timetable Management" below)
The following commands below are part of the application’s Timetable Management, which allow you manage the timetables of your academic plan.
All the following commands require a student to be selected (using the student active command).
|
To see a summary of the student and timetable you have selected, use the status command.
|
Adding a timetable: timetable add
You can use this command to add a timetable to the specified semester of the selected student (see the student active command).
This command requires the YEAR and SEM to conform to the parameter syntax in Common Parameters.The YEAR parameter must be a valid degree year (from 1 to 6, inclusive).The SEM parameter must be one of the following: ONE, TWO, SPECIAL_ONE, SPECIAL_TWO.
|
Format: timetable add year/YEAR sem/SEM
Example:
-
timetable add year/2 sem/ONE
Removing a timetable: timetable remove
You can use this command to remove a timetable to the specified semester of the selected student (see the student active command).
|
This command cannot be undone. Removing a timetable from the selected student will permanently delete its data from the save file. Be sure to remove your intended timetable by checking the list of timetables with the timetable list command.
|
This command requires the YEAR and SEM to conform to the parameter syntax in Common Parameters.The YEAR parameter must be a valid degree year (from 1 to 6, inclusive).The SEM parameter must be one of the following: ONE, TWO, SPECIAL_ONE, SPECIAL_TWO.
|
Format: timetable remove year/YEAR sem/SEM
Example:
-
timetable remove year/2 sem/ONE
Selecting a timetable: timetable active
You can use this command to select a timetable of the specified semester of the selected student (see the student active command).
This command requires the YEAR and SEM to conform to the parameter syntax in Common Parameters.The YEAR parameter must be a valid degree year (from 1 to 6, inclusive).The SEM parameter must be one of the following: ONE, TWO, SPECIAL_ONE, SPECIAL_TWO.
|
Format: timetable active year/YEAR sem/SEM
Example:
-
timetable active year/2 sem/ONE
Viewing the timetable list: timetable list
You can use this command to list all the timetables of the selected student (see the student active command).
Format: timetable list
Example:
-
timetable list
Grade Management
(Vincent wrote the section "Grade Management" below)
The following commands below are part of the application’s Grade Management, which allow you to manage and view your grades to see modules affected in your academic plan.
|
The same module can be added into multiple timetables of the same student. Therefore, each enrollment (one per semester) of the same module can have a separate grade. For example, it is possible for you to enroll in the module CS2040 during year/1 sem/ONE and then year/1 sem/TWO.You may refer to Timetable Management to see how you can use timetables. |
Managing a module’s grade: module grade
You can use this command to manage the grades of your modules. The following variants of the command can view and set the grade of the module you specify.
This command and its variants require a timetable to be selected (using the timetable active command).
|
Viewing a module’s grade
You can use this command to display the grade of the specified module.
|
This command only shows the grade of the specified module in your currently selected timetable. You can use the student grade command to view the grades of all modules together.
|
Format: module grade MODULE_CODE
Example:
-
module grade CS2040
Setting a module’s grade
You can use this command to set the grade of the specified module.
The modules which you set the grades of using this command will be counted towards your academic performance (see the student grade command).
| This command only modifies the grade of the module in the selected timetable. Other enrollments with the same module code in different semesters will not be affected. |
Format: module grade MODULE_CODE grade/GRADE
Example:
-
module grade CS2040 grade/A
Exercising the Satisfactory/Unsatisfactory option for a module
You can declare that you have chosen to exercise the Satisfactory/Unsatisfactory for a module using the following variant of this command.
The modules which you set the grades of using this command are not counted towards your academic performance (see the student grade command). However, grade you specify will still be recorded.
| This command only modifies the grade of the module in the selected timetable. Other enrollments with the same module code in different semesters will not be affected. |
Format: module grade MODULE_CODE su/GRADE
Example:
-
module grade IS1103 su/F
Viewing a student’s grade: student grade
You can use this command to display the Cumulative Average Point of the selected student (see the student active command).
Other statistics such as the number of modules declared as Satisfactory/Unsatisfactory are also shown.
You may also see a list of modules taken and their grades.
This command requires a student to be selected (using the student active command).
|
Use the module grade command to set the grade of modules in the currently selected timetable of a student.
|
| The same module can be added into multiple timetables of the same student. Refer to Timetable Management to see how you can use timetables. |
| Use this command to be informed of your academic progress and to plan ahead for difficult modules. |
Format: student grade
Example:
-
student grade
Contributions to the Developer Guide [IN DRAFT]
Given below are sections I contributed to the Developer Guide. They showcase my ability to write technical documentation and the technical depth of my contributions to the project. |
Grade Management
(Vincent wrote the section "Grade Management" below)
The Grade Management feature allows users to record and keep track of their grades in their academic plan, helping them to make better academic plans.
The Grade Management feature is made of two parts:
-
Module Grade Management:
module grade -
Student Grade Display:
student grade
Module Grade Management
The Module Grade Management allows users to record their grades.
Grade Representation
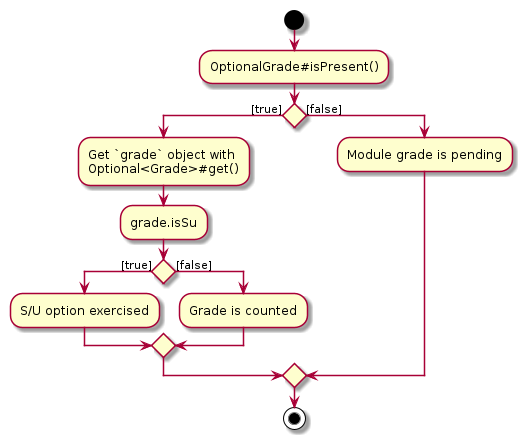
Each enrollment in each timetable of a student stores a module grade. The module grade can be pending, have the Satisfactory/Unsatisfactory option exercised, or be graded.
More specifically:
Each Student stores Enrollment objects in each value (of type TimeTable) of its timeTableMap : TimeTableMap.
Each Enrollment is then 1-1 associated to exactly one credit : Optional<Grade>.
When credit is equal to Optional.<Grade>empty(), the enrollment is considered to have a pending module grade.
When credit.isPresent() is true, then the Grade stored within can be interpreted as follows:
Grade objects are immutable, and its fields therefore can have public access modifiers and are final. Suppose there is a grade : Grade object.
The grade.letterGrade : LetterGrade represents the letter grade received for an enrollment, which can be one of:
A+, A, A-, B+, B, B-, C+, C-, D+, D, F, CS, CU, W or EXE.
The grade.isSu : boolean represents whether the Satisfactory/Unsatisfactory option was exercised for the grade.
For example, a student could choose to exercise the Satisfactory/Unsatisfactory option for a grade of "B+".
This is distinct from the grade.letterGrade.isSu : boolean, which determines if the letter grade itself is ungraded.
This occurs for module grades such as "CS" and "CU".
When at least one of grade.isSu or grade.letterGrade.isSu is true, the Grade object does not count towards academic performance.
The semantics of the Optional<Grade> object in an Enrollment can be summarised in the activity diagram below.
Module Grade Commands
The user views and sets grades of enrollments with a single command "module grade". Parsing of the command is handled by ModuleGradeCommandParser.
The ModuleGradeCommandParser parses the command string (e.g. "CS2040 grade/A") into the preamble which contains the module code, and the arguments which contains the grade.
Then it returns a subclass of ModuleGradeCommand (itself a subclass of ModuleCommand) which is declared abstract.
Its concrete subclasses are ModuleGradeViewCommand, ModuleGradeSetCommand and ModuleGradeResetCommand.
Refer to Sub-Commands to see how the ModuleGradeCommandParser is invoked by ModuleCommandParser.
-
To view a grade, the user uses the command format
"module grade MODULE_CODE". This will generate aModuleGradeViewCommandobject. -
To set a grade, there are two options. Both generate a
ModuleGradeSetCommandobject.-
To set a grade counted towards academic performance, the user uses the command format
"module grade MODULE_CODE grade/GRADE". -
To exercise the Satisfactory/Unsatisfactory option, the user uses the command format
"module grade MODULE_CODE su/GRADE".
-
-
To reset a grade, the user uses the command format
"module grade MODULE_CODE grade/". This will generate aModuleGradeResetCommandobject.
If both module/GRADE and su/GRADE parameters are supplied, the ModuleGradeCommandParser throws a ParseException
The ModuleGrade*Command#execute(Model) methods of the command objects generated then use Model#getModuleGrade(ModuleCode) and Model#setModuleGrade(ModuleCode) to get and set the enrollment’s grade, respectively.
The following class diagram summarises the associations of classes involved in the "module grade" command.
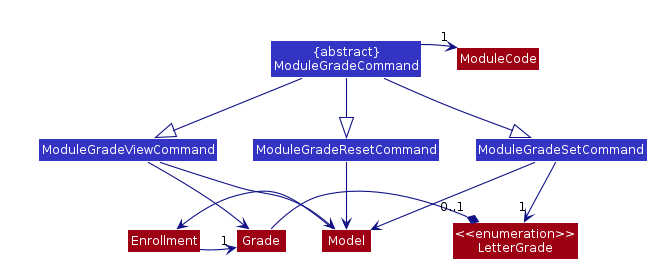
module grade classesStudent Grade Display
The user may also view the cumulative grades of the selected Student using the "student grade" command.
The StudentCommandParser directly creates a StudentGradeCommand object (a subclass of StudentCommand), and all preamble and arguments are ignored.
StudentGradeCommand#execute(Model) then loops through all StudentSemester the selected student has using Model#getStudentSemesters(),
which returns the StudentSemester in chronological order (as defined in StudentSemester#compareTo()).
This ordering is more convenient to the user compared to the arbitrary ordering of internal to TimeTableMap.
Using Student#getTimeTable(StudentSemester) : TimeTable and TimeTable#getEnrollments() : UniqueEnrollmentList, each enrollment of each timetable is iterated in order.
Then Enrollment#getGrade() : Optional<Grade> is used to get the grade (pending, or S/U option exercised, or graded).
Since Grade#toString() is overloaded, StudentGradeCommand only needs to handle the case where the Optional<Grade> is empty.
The result text is accumulated to form a listing of modules taken and their grades.
During iteration, a CumulativeGrade accumulator object is also used to tally up statistics related to the grades of the enrollments.
CumulativeGrade handles the number of credits taken for graded, S/U-exercised and all Grade objects supplied.
StudentGradeCommand invokes the CumulativeGrade#accumulate(Grade grade, int credits) method, which handles all the logic necessary to correctly accumulate grade statistics.
Design Considerations
Aspect: Syntax of "module grade" command
-
Alternative 1: (current choice) Use a single command with
grade/andsu/prefixes which are mutually exclusive-
Pros: Only a single command is needed to handle both graded and S/U-exercised grades. Resetting an enrollment’s grade is also easy by allowing the user to specify an empty
grade/argument. -
Cons: The syntax might be confusing to the user, and there is the edge case of both
grade/andsu/being supplied, which must be handled.
-
-
Alternative 2: Use separate sub-commands for setting, resetting and exercising the Satisfactory/Unsatisfactory option.
-
Pros: The syntax is simpler for the user because there is only one format for each command.
-
Cons: Further commands have to be implemented, which causes code duplication.
-
Aspect: Representation of enrollment grades
-
Alternative 1: (current choice) Use an
Optional<Grade>which stores aLetterGradeandisSu : boolean-
Pros: Clearly distinguishes between a pending grade, a grade with Satisfactory/Unsatisfactory option exercised, and a grade which is counted towards academic performance.
Serialisation also directly corresponds tonullfor a pending grade. -
Cons: Handling the case where the grade is pending is not convenient for iteration.
-
-
Alternative 2: Use
Gradeto store whether the the grade is pending-
Pros: More convenient to use for developers.
-
Cons: Serialisation is more complex, and more complex code is needed to handle pending grades in the implementation of
Grade.
-
Planner Model
(Vincent wrote this section "Planner Model" below)
The Planner class stores information about the App’s state.
Many operations of the Planner must be inherently stateful because user operations include selecting students and timetables,
which are then also known as the 'active student' and 'active timetable', respectively.
These selection operations affect which students and timetables future operations use.
The App needs access to the list of students, the selected student, and the selected timetable of the selected student need to be stored.
As described in Student Model (in Model Component), the Student stores information related to the timetables it has, which stores the enrollments for each timetable. The Planner only needs to retain indices/keys to the active student and semester.
Therefore, Planner stores information including:
-
UniqueStudentList : students, which is the list of students in the planner.
Uniqueness (usingStudent#isSameStudent) of the students is enforced. This prevents two students from having the same name. -
int : activeStudentIndex, an index for the currently selectedStudent.
This index refers to a valid student exactly when the index is within the bounds of thestudentslist.
Therefore, no student is selected if the index is out of bounds of thestudentslist. -
StudentSemester : activeSemester, which corresponds to the currently selectedTimeTablefor the currently selectedStudent. This isnullwhen there is no active timetable selected.
ThePlannermust have a validStudentselected in order to have a non-nullactiveSemester, which is an invariant enforced byPlanner#getActiveTimeTable()
All of these fields have the protected access modifier to hide and encapsulate the data. To access this data, the following methods are used by the Model:
-
Student getActiveStudent()to get the activeStudent.
Note that the activeStudentis not stored directly, but with an indexactiveStudentIndexas previously mentioned. -
Student getActiveSemester()to get the activeStudentSemestercorresponding to the active timetable. -
TimeTable getActiveTimeTable()to get the activeTimeTable.
This throws aNoActiveStudentExceptionexception if aStudentis not already selected.
Note that the activeTimeTableis not stored directly, but withactiveSemesteras previously mentioned.
The following methods change which student or timetable is selected:
-
void activateStudent(Student student)selects thestudentin thePlanner
This throws aStudentNotFoundExceptionexception if thestudentis not in thePlanner.
Note that the student is considered the same as another student in the list ifStudent#isSameStudent()returnstrue. This allows activation of a student after its timetable is changed. -
void activateSemester(StudentSemester semester)selects the timetable corresponding tosemesteras the active timetable.
This throws aNoActiveStudentExceptionexception if aStudentis not already selected. -
void activateValidStudent()andvoid activateValidSemester()are similar, but may select any arbitrary valid student and timetable respectively.
The following methods replace values stored by the student list:
-
void setStudents(List<Student> students)replaces the student list entirely. This does not reset the active student or active timetable, which may become invalidated.
Make sure to usePlanner#activateStudent(null)if you wish to reset this too. -
void replaceActiveStudent(Student student)replaces the currently selectedStudentwith the specifiedstudentin the student list. -
void replaceActiveTimeTable(TimeTable timeTable)replaces the currently selectedTimeTablewith the specifiedtimeTablein the selected student’sTimeTableMap.
Many further methods modify properties of the selected student and timetable. Some examples are:
-
void addExemptedModule(ModuleCode moduleCode)which adds an exempted module with the givenmoduleCodeto the active student. -
void addSemesterTimeTable(StudentSemester studentSemester)which adds a timetable to the selected student using the specifiedstudentSemester. -
void removeEnrollment(ModuleCode moduleCode)which removes an enrollment with the givenmoduleCodefrom the selected timetable.
Avoid storing references to, and avoid directly calling methods with mutate Student or Planner objects retrieved from Planner or Model, as Student is mutable.Consider using the methods of Model directly to interact with the Model instead.
|
Design Considerations
Aspect: Mutability of data stored in Planner
-
Alternative 1: (current choice)
Plannerstores references to mutableStudentobjects which store mutableTimeTableobjects.
Mutation ofStudentobjects is allowed, but only through getter/setter methods.-
Pros: Mutability of
Studentenables developers to directly modify aStudentdirectly with its methods. This is very convenient and decouples the implementation ofStudentfrom the implementation ofPlanner.
This also makes implementation ofPlannersignificantly easier, especially due to the nesting of data structures. -
Cons: There are no guarantees of immutability, and operations which mutate a
Studentcan affect thePlanner. ThePlanneris unable to observe any changes made to theStudentobject stored.
-
-
Alternative 2:
Plannerstores a list of immutableStudentobjects, which also store immutableTimeTableobjects.-
Pros: Immutability of the
Studentobjects is enforced. Accidental mutation of a storedStudentusing a reference is not possible without using methods of thePlanner. -
Cons: Making modifications to a stored
Studentwould require the instantiation of a new modified copy.
All involved classes (Planner,Student,TimeTableMap,TimeTable, etc.) would have to implement methods to mutate the required fields.
-
Student Features
(Vincent wrote the section "Student Features" below)
The Student Feature allows users to manage multiple academic plans, add and remove enrollments, and check their degree progression and grades.
As described in Student Model (in Model Component), the Student stores information related to the timetables it has, which in turn stores the enrollments for each timetable. This section will focus on the management of Student using commands provided to the user.
As users may want to do multiple operations on the same student, the user can select one student as the 'active student'.
Many commands then operate on the 'active student'. Certain commands (such as "student active" and "student remove") can cause the 'active student' to be deselected. How this is stored is described in more detail in Planner Model.
The following sequence diagram shows how the StudentAddCommand works by showing interactions
within the Model component when
Logic#execute("student add n/Alice major/CS") is called.
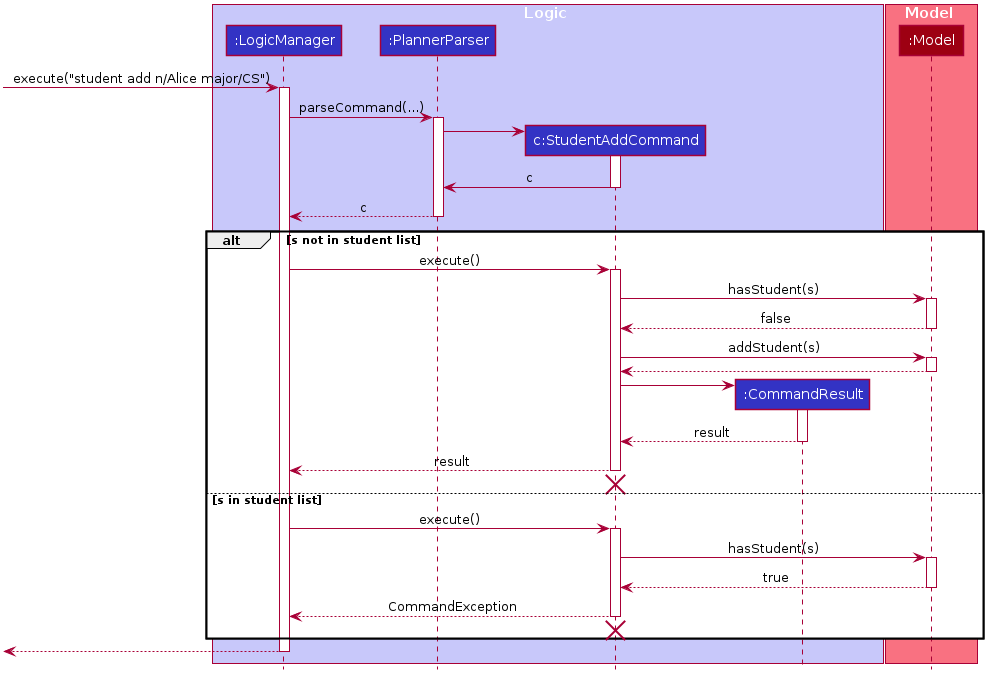
StudentAddCommand
The lifeline for StudentAddCommand should end at the destroy marker (X). However, due to a limitation of PlantUML, the lifeline reaches the end of diagram.
|
For brevity, the Student that the StudentAddCommand was constructed with is denoted as "s".The actual parsing (i.e. PlannerParser calling StudentCommandParser which calls StudentAddCommandParser) is omitted for clarity.For brevity, the parameter of PlannerParser#parseCommand() (which is just "student add n/Alice major/CS") is also omitted.
|
"Active student" and "selected student" are used interchangably to refer to the student the user has selected with the "student active" command.
|
Student Management
The user may add, remove, select and list students with the "student add", "student remove", "student active" and "student list" command strings, respectively.
These correspond to the StudentAddCommand, StudentRemoveCommand, StudentActiveCommand and StudentListCommand classes.
These sub-commands are parsed by the Student*CommandParser sub-command parsers, with the exception of StudentListCommand which is directly returned by StudentCommandParser.
Refer to Sub-Commands to see how Student*CommandParser are invoked by StudentCommandParser.
The sub-commands "remove" and "active" for the "student" command both require a unsigned positive integer "INDEX" in the command string.
No arguments are allowed because they will be interpreted as being part of the "INDEX" string.
Similarly, the "add" sub-command allows exactly "n/NAME major/MAJOR" in its parameters.
This can be explained by ArgumentTokenizer.tokenize() only splitting arguments using the prefixes provided to it.
Therefore, the commands correctly reject prefixes not specified in the command usage text, although the error message can be confusing
since the user might expect that all prefixes are split before validation.
Then, Student*Command objects are created and returned by the Student*CommandParser#parse().
* For the "student add" command, StudentAddCommand is constructed with a new Student object created from the "NAME" and "MAJOR" arguments provided.
* For the "student remove" and "student active" commands, the Student*Command is constructed with an Index object representing the "INDEX" argument provided.
Adding a Student
When the user enters the "student add" command, StudentAddCommand#execute(Model model) is executed. The following steps occur:
-
Checks if the
student : Studentis present in theModelusingModel#hasStudent(Student).-
If so, then a
CommandExceptionis thrown.
-
-
Otherwise, Add the
studentto theModelusingModel#addStudent(Student). -
Generate success message and return a
CommandResult.
Listing Students
When the user enters the "student list" command, StudentListCommand#execute(Model model) is executed.
The list of students is obtained with Model#getStudentList(). The list of students is then formatted into a newline-separated, numbered list string,
which is used in the success message.
This operation cannot fail in any valid Planner state.
|
Removing and Selecting a Student
When the user enters the "student remove" or the "student active" command, Student*Command#execute(Model model) (corresponding to the sub-command) is executed.
The following steps occur:
-
The
Indexsupplied to theStudent*Commandconstructor is checked if it is in the bounds of the student list by comapring withModel#getStudentList().size().-
If not, a
CommandExceptionis thrown with theMessages.MESSAGE_INVALID_STUDENT_DISPLAYED_INDEXtext.
-
-
The
Studentcorresponding to theIndexis retrieved usingModel#getStudentList().get(int).-
For a
StudentRemoveCommand,Model#removeStudent(Student)is called to remove the student.
By removing the reference to theStudentin the list of students inPlanner, all data related to the student is hence removed. -
For a
StudentRemoveCommand,Model#activateStudent(Student)is called to select the student.
-
Design Considerations
-
Alternative 1: (current choice)
Studentis mutable.-
Pros: Very convenient for developers to change
Studentobjects imperatively. -
Cons: If references of the
Studentobject are retained and then mutated unintentionally, theStudentobject in thePlannerwill also be mutated.
Hence, developers need to be careful about calling methods which mutate theStudentobject. This increases coupling betweenStudentandPlanner.
-
-
Alternative 2:
Studentis immutable.-
Pros: Immutability is guaranteed. Accidental mutation of the
Plannercannot occur with any stray references. -
Cons: Mutating nested data structures in the
Studentobject (e.g. a singleGradeof anEnrollmentstored in aTimeTableof theStudent) can be very messy. To mutate such data,Studentor the caller needs to know about the implementation details of all involved nested classes (e.g.TimeTableMap,StudentSemester,TimeTable,Enrollment, etc.), which increase coupling significantly.
An alternative is thatModelandPlannerimplements all the required mutation methods, handling said dependencies. This increases implementation complexity massively.
-
-
Alternative 3:
Studentis mutable, but only deep copies ofStudentare returned byModel.-
Pros:
-
Immutability of the
Studentobjects in thePlanneris preserved. Accidental mutation of a returned copy does not result in mutation of the original stored inPlanner.
Developers can use the mutation methods ofStudentdirectly without worrying of mutatingPlanneraccidentally. -
The implementation is also less complex than full immutability.
-
-
Cons:
-
The implementation of a deep copy must be handled carefully to prevent the same reference from being used anywhere in a copied class (and thus only providing a shallow copy).
-
The usage of copies to mutate a
Studentin thePlanneris also not as convenient, because the old copy must be swapped with a new one.
This can become problematic in future operations where the user is allowed to change identity fields (those affectingStudent#isSameStudent()), such as changing the name of the student. Since the new student will have a different name from the original, a different method of identifying students modified will need to be used.
-
-
Timetable Features
(Vincent wrote the section "Timetable Features" below)
The Timetable Feature allows users to manage timetables across semesters.
"Active timetable" and "selected timetable" are used interchangably to refer to the timetable the user has selected with the "timetable active" command.
|
Timetable Implementation
Each Student stores a TimeTableMap representing the timetables of the student. The TimeTableMap stores a key-value pair mapping a StudentSemester to a TimeTable.
For each TimeTableMap, the StudentSemester keys must be unique. Therefore, there should not be duplicate semester keys.
This corresponds to each semester in the TimeTableMap only having one timetable.
Note that this does not preclude multiple equal (TimeTable#equals()) but not identical (==) TimeTable objects
from being associated to different StudentSemester objects. This happens whenever an empty timetable is added to two different semesters with the "timetable add" command.
A StudentSemester stores a SemesterYear instead of a Semester directly.While storing the academic year ( acadYear) is supported by SemesterYear, it is currently unused in the App’s code.
Only SemesterYear.sem is used for storing the Semester represented.
|
Timetable Management
Using the "timetable add", "timetable remove", "timetable list" and "timetable active" commands, users can manage the timetables of Student objects in the Planner.
Listing Timetables
The StudentSemester objects corresponding to the student’s timetables can be listed using the "timetable list" command string.
The TimeTableCommandParser directly creates a TimeTableListCommand object (a subclass of TimeTableCommand), and all preamble and arguments are ignored.
TimeTableListCommand#execute(Model) first checks if there is an active student with Model#hasActiveStudent(). If not, it throws a CommandException with text Messages.MESSAGE_NO_STUDENT_ACTIVE.
Then it gets all StudentSemester keys the selected student has in its TimeTableMap using Model#getStudentSemesters(),
which returns the StudentSemester in chronological order (as defined in StudentSemester#compareTo()).
This ordering is more convenient to the user compared to the arbitrary ordering of internal to TimeTableMap.
This list is then passed to StringUtil.wrapCollection(Collection), which formats the list of StudentSemester into a comma-separated string.
The string is also wrapped for better readability by the user.
Specifying Timetables in Add, Remove and Active Commands
The sub-commands "add", "remove" and "active" for the "timetable" command all require the arguments "year/YEAR sem/SEM",
which are the DegreeYear and Semester corresponding to the StudentSemester respectively.
Both arguments are mandatory.
-
If both arguments are missing, a
ParseExceptionwill be thrown with theMESSAGE_USAGEstring of the correspondingTimeTable*Command.
This provides instruction about the specific sub-command for the user. -
If any argument is missing, the
TimeTable*CommandParserwill throw aParseException.
Validation of"YEAR"and"SEM"also occur. If"YEAR"is not a valid degree year (unsigned integer from 1 to 6 inclusive), or if"SEM"is not one of"ONE", "TWO", "SPECIAL_ONE", "SPECIAL_TWO", then the sub-command parser will also throw aParseException.
Once the command string is parsed, the DegreeYear and Semester will be used to create a StudentSemester, which is passed to the constructor of TimeTable*Command.
Adding, Removing and Selecting a Timetable
The TimeTable*Command classes then receive a StudentSemester in its constructor parameter.
-
All
TimeTable*Command#execute(Model)methods first check thatModel#hasActiveStudent() : booleanistrue. This is needed because all these commands require an active student.
Similar toTimeTableListCommand(documented above in Listing Timetables), if there is no active student, aCommandExceptionwill be thrown. -
Further checks may occur for different timetable sub-commands:
-
TimeTableAddCommandchecks if there is no matching semester (withModel#hasSemester()), then adds the timetable withModel#addSemesterTimeTable() -
TimeTableRemoveCommandchecks if there is a matching semester (withModel#hasSemester()), then removes the timetable withModel#removeSemesterTimeTable()
By removing the reference to theTimeTablein theTimeTableMapof the selectedStudent, all data related to the timetable is hence removed. -
TimeTableActiveCommandchecks if there is a matching semester (withModel#hasSemester()), then sets the timetable as active withModel#activateSemester()
-
Design Considerations
Aspect: Storage of different timetables across semesters
-
Alternative 1: (current choice)
TimeTableMapis aMap<StudentSemester, TimeTable>-
Pros: Enforces uniqueness of a
TimeTablevalue in theTimeTableMap, as explained earlier. -
Cons:
-
Serialisation of the
TimeTableMapis more complex, requiring conversion toJsonAdaptedTimeTableMap, which is a list ofJsonAdaptedTimeTablePair. Deserialisation ofMap<K,V>cannot happen automatically for custom classesKdue to some limitations of Jackson. -
Ordering of timetables in
TimeTableMap.entrySet()is arbitrary, which may be inconvenient for users.
-
-
-
Alternative 2:
TimeTableMapis aListofPair<StudentSemester, TimeTable>-
Pros:
-
Serialisation of
TimeTableMapis straightforward. -
Ordering of
StudentSemestercan easily be enforced by sorting theTimeTableMapbyStudentSemesterafter every operation.
-
-
Cons: Uniqueness constraint will have to be enforced by ensuring that insertions and deletions with a given
StudentSemesterkey do not cause duplicateStudentSemesterobjects.
-
Backend & Debugging
Sub-Commands
(Vincent wrote the section "Sub-Commands" below)
Central to the command syntax of the App is the organisation of commands into sub-commands.
Commands such as "student" show the relevant instructions for how to use its sub-commands, such as "student add".
This organisation of commands into a hierarchy improves usability by the user, and the organisation of the command implementations into packages.
Many commands of the App are organized into 'parent commands', such as "student".
Its sub-commands are known as 'child commands' (e.g. "student add").
'Parent commands' must have a corresponding Parser and a Command.
For example,
the corresponding Parser subclasses for the "student" command and its sub-commands are in the
parser.student package,
while the Command subclasses are in the
commands.student package.
Note that for a sub-command (e.g. "student add"), the 'parent command' parser only parses the command word for the 'parent command' (e.g. "student"), while the 'child command' only parses the command word for its sub-command (e.g. "add").
The following sequence diagram shows the interaction between the *Command and *CommandParser classes of 'parent commands' and 'child commands' when a command string is parsed.
The 'parent command' is denoted as "X", while the 'child command' is denoted as "Y". The corresponding Command and Parser classes have been named accordingly.
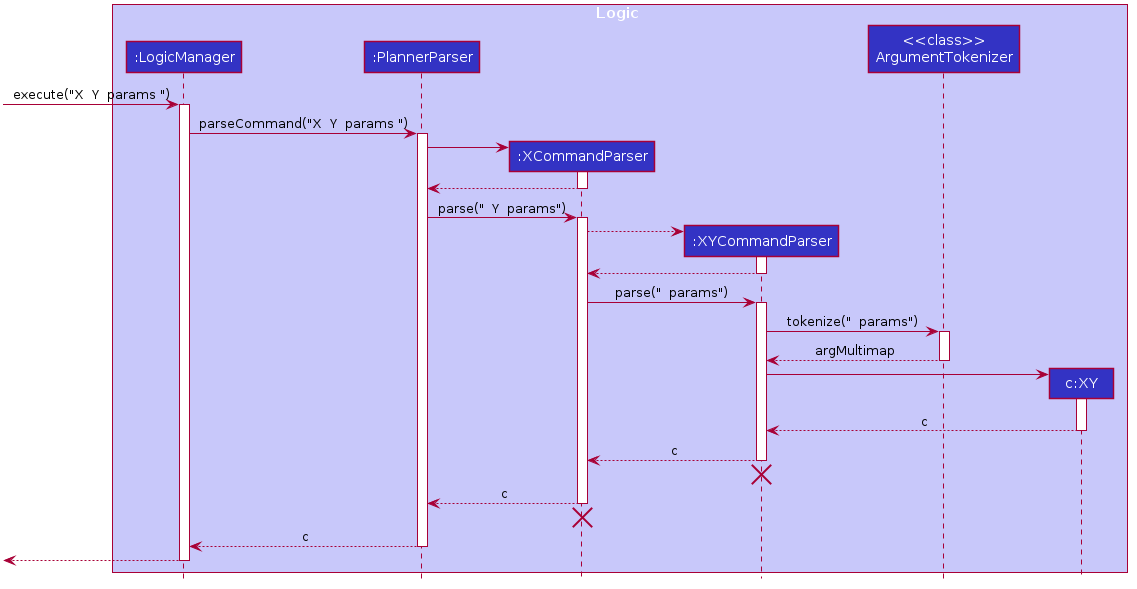
The lifeline for XCommandParser and XYCommandParser should end at the destroy marker (X) but due to a limitation of PlantUML, the lifeline reaches the end of diagram.
|
Parent and child command classes
The 'parent command' class (e.g. StudentCommand) should be declared abstract, and directly extend the Command class.
All sub-command classes should then extend the 'parent command' class (e.g. StudentAddCommand extends StudentCommand).
Similar to non-hierarchical commands, 'parent command' classes may contain the fields COMMAND_WORD and MESSAGE_USAGE
for use in the corresponding 'parent command' parsers. This decouples the message details of the command from the parsing of the commands.
Parent command parser class
'Parent command' parsers are required to dispatch parsing to a sub-command. This is somewhat similar to the main PlannerParser.
However, the splitting of the sub-command string into the sub-command name and its arguments
is handled by SubCommandSplitter.java.
This utility class handles some edge cases related to whitespace, and is preferred when implementing a 'parent command'.
The Parser for the 'parent command' (e.g. StudentCommandParser) should implement the Parser<T> interface,
where T is the class of the 'parent command' (e.g. StudentCommand).
This is different from child Command classes, which should extend their parent Command class
|
To split the sub-command string into the sub-command and arguments, use:
-
SubCommandSplitter(String userInput, String failureMessage)to construct theSubCommandSplitterobject -
SubCommandSplitter#getCommand()to get the command string -
SubCommandSplitter#getSubCommand()to get the arguments.
Note that it is possible to create a more deeply nested hierarchy of commands subclassing theCommandsubclass appropriately.
Parsing of a hierarchical command string (e.g."student add n/Alice major/CS") happens in the following manner:
-
PlannerParserremovesstudentfrom the command string. A leading space followed by"add n/Alice major/CS"is passed toStudentCommandParser. -
StudentCommandParserinvokes methods inSubCommandSplitterwhich parses the remaining command string into the"add"command word and"n/Alice major/CS"as the arguments. -
StuentCommandParsermatches the"add"string and creates a newStudentAddCommandParserwith the input string"n/Alice major/CS". -
StudentAddCommandParsercan now parse the given preamble and arguments usingArgumentTokenizer
Child command parser class
'Child command' parsers should implement Parser<T>, where T is the 'child command' class.
'Child command' parsers are responsible for parsing the preamble and arguments of the input.
It is not always necessary to create a parser for a 'child command'.
If the 'child command' may ignore any given preamble or arguments provided by the user,
the 'parent command' parser may simply return an instance of the 'child command' directly.
For example, StudentCommandParser directly returns a StudentListCommand given the "list" command word.